SkySync™
& Mini Hub
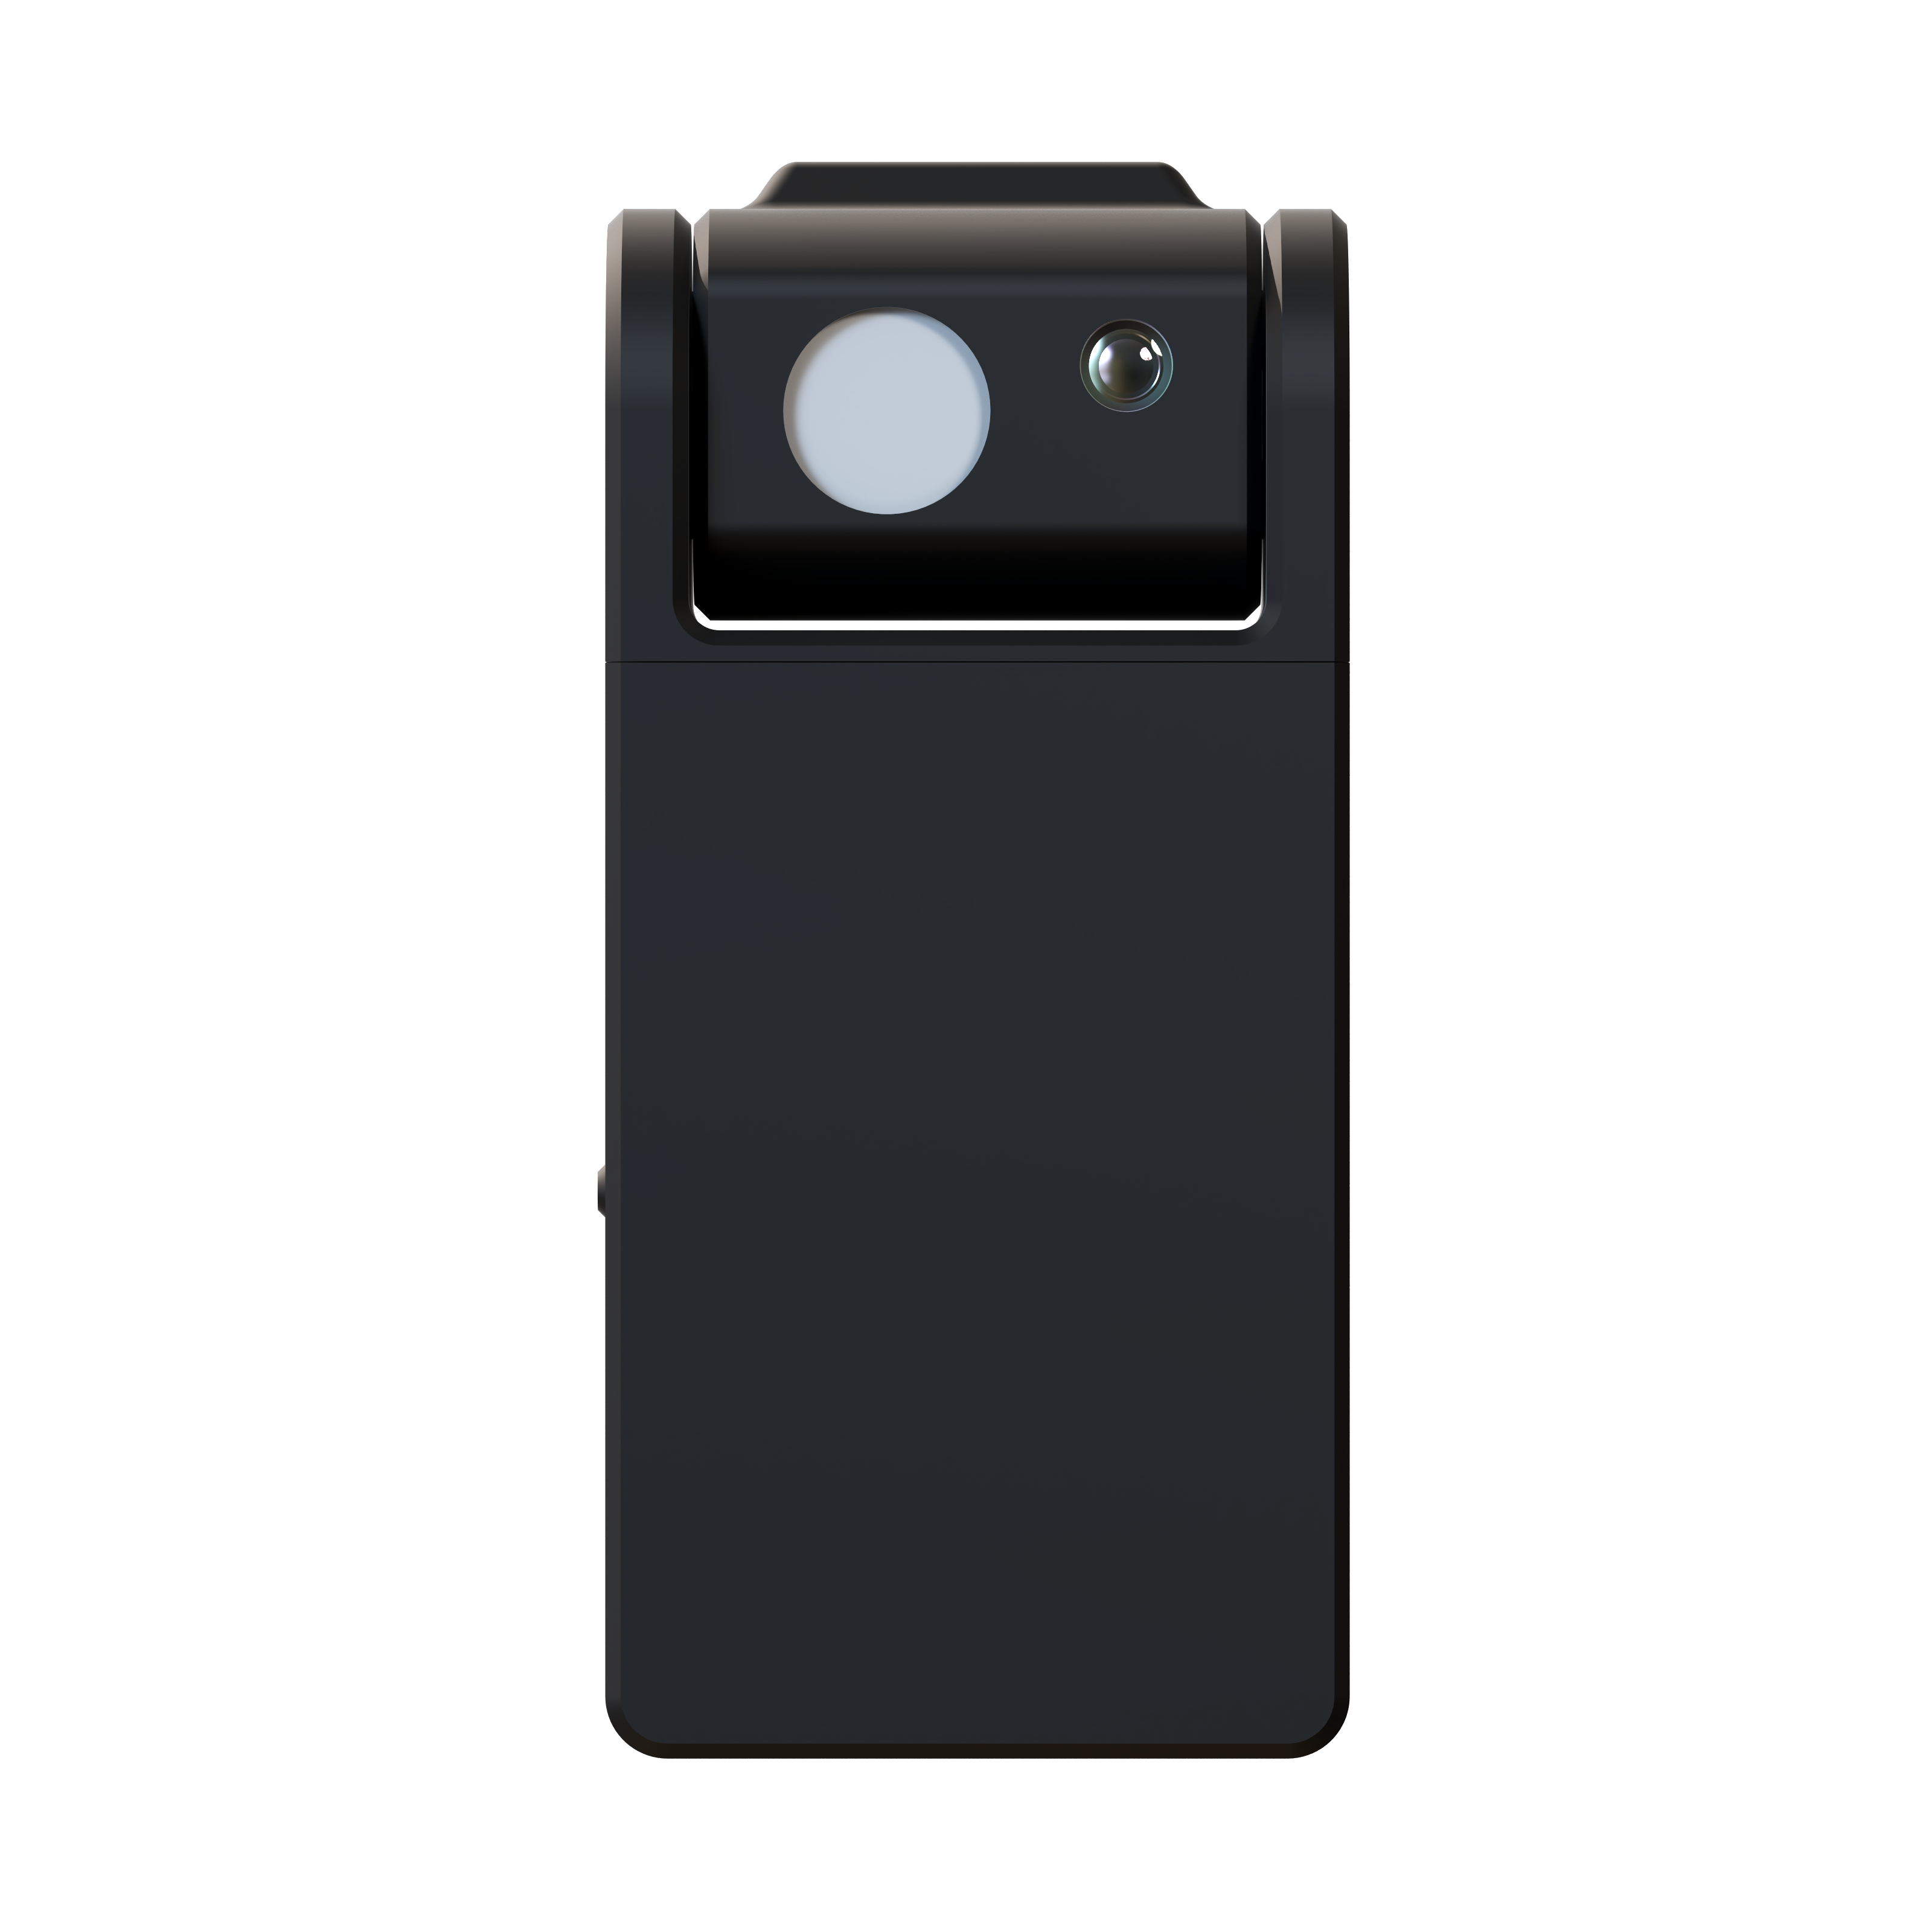
SkySync is the first sensor capable of capturing the true color of a blue sky and bringing it indoors. Mounted to your window, it streams real-time color and brightness data to your Circadian Sky or Virtual Sun fixture.
The included Mini Hub extends SkySync's range across your building via your local network, ensuring every fixture stays synchronized with the sky outside.
| Compatible with | Circadian Sky • Virtual Sun |
| Firmware req. | v2.0.61 or later |
| Warranty | 5 years |
In This Manual
Quick Start Guide
What's in the Box
| 1 | SkySync sensor (battery pre-installed) |
| 2 | Innerscene Mini Hub |
| 3 | USB-C cable & wall adapter (for Mini Hub) |
| 4 | Mounting tape (Gorilla Tough & Clear) |
| 5 | Quick Start card (this document) |
- You need a Circadian Sky or Virtual Sun fixture with firmware v2.0.61+ (update to unlock higher CCTs, see p.4)
- Choose a window with a clear view of the sky; avoid frosted or heavily patterned glass
- Best results: set up on a clear sky day
Step 1 — Mount SkySync to a Window with Double-Sided Tape
SkySync is rated for indoor use (IP20); mount it on the interior. For outdoor mounting, use the waterproof enclosure (sold separately).
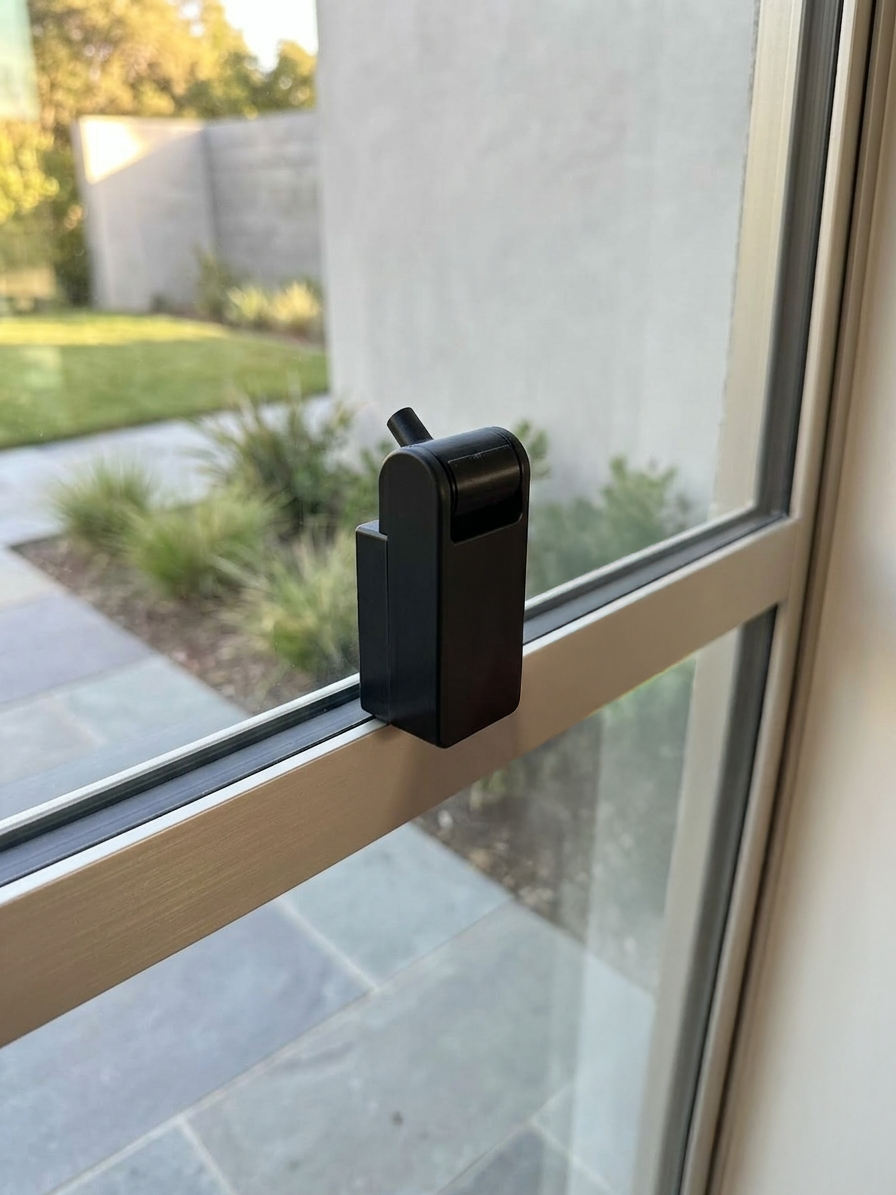
Step 2 — Aim the Sensor, Then Fit the Hood
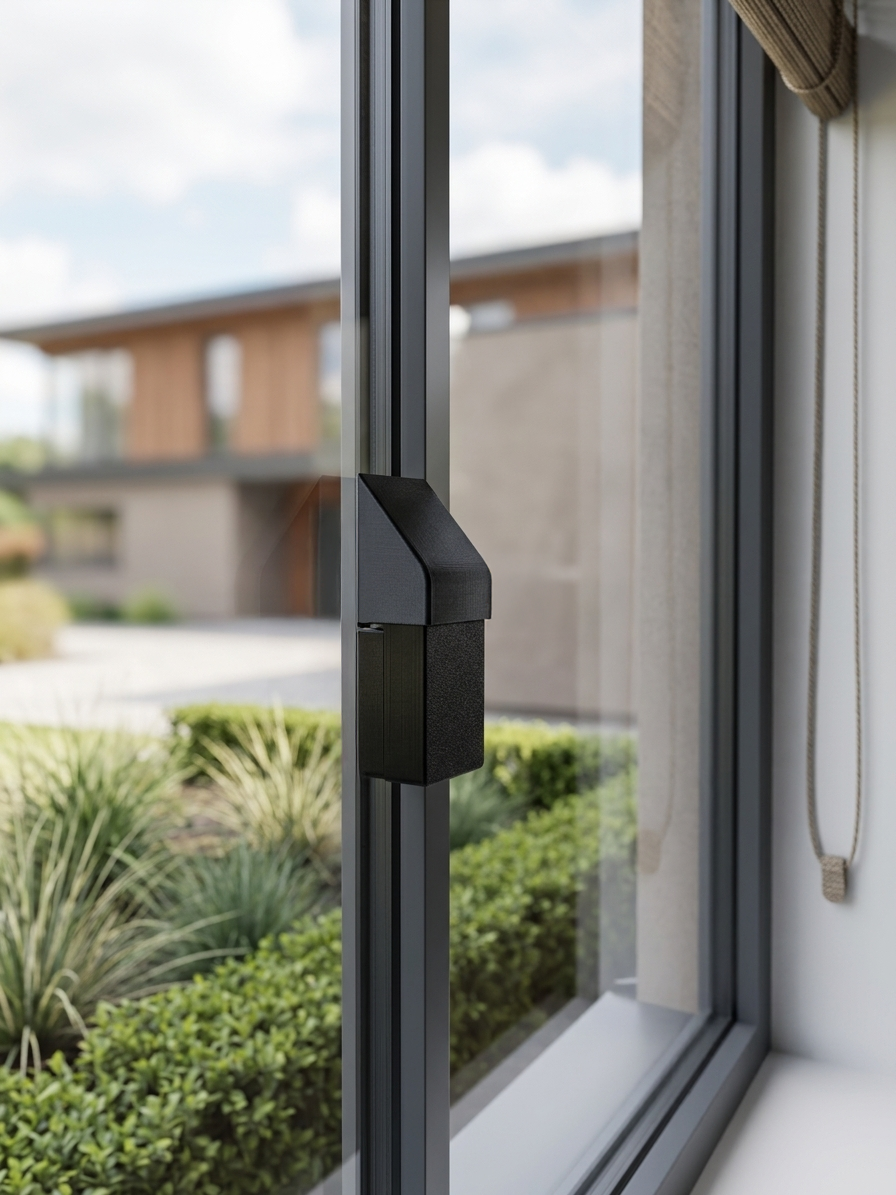
If CCT reads low on a clear day: aim the barrel more steeply, confirm the hood is fitted, and test with room lights off.
Understanding the Home Screen
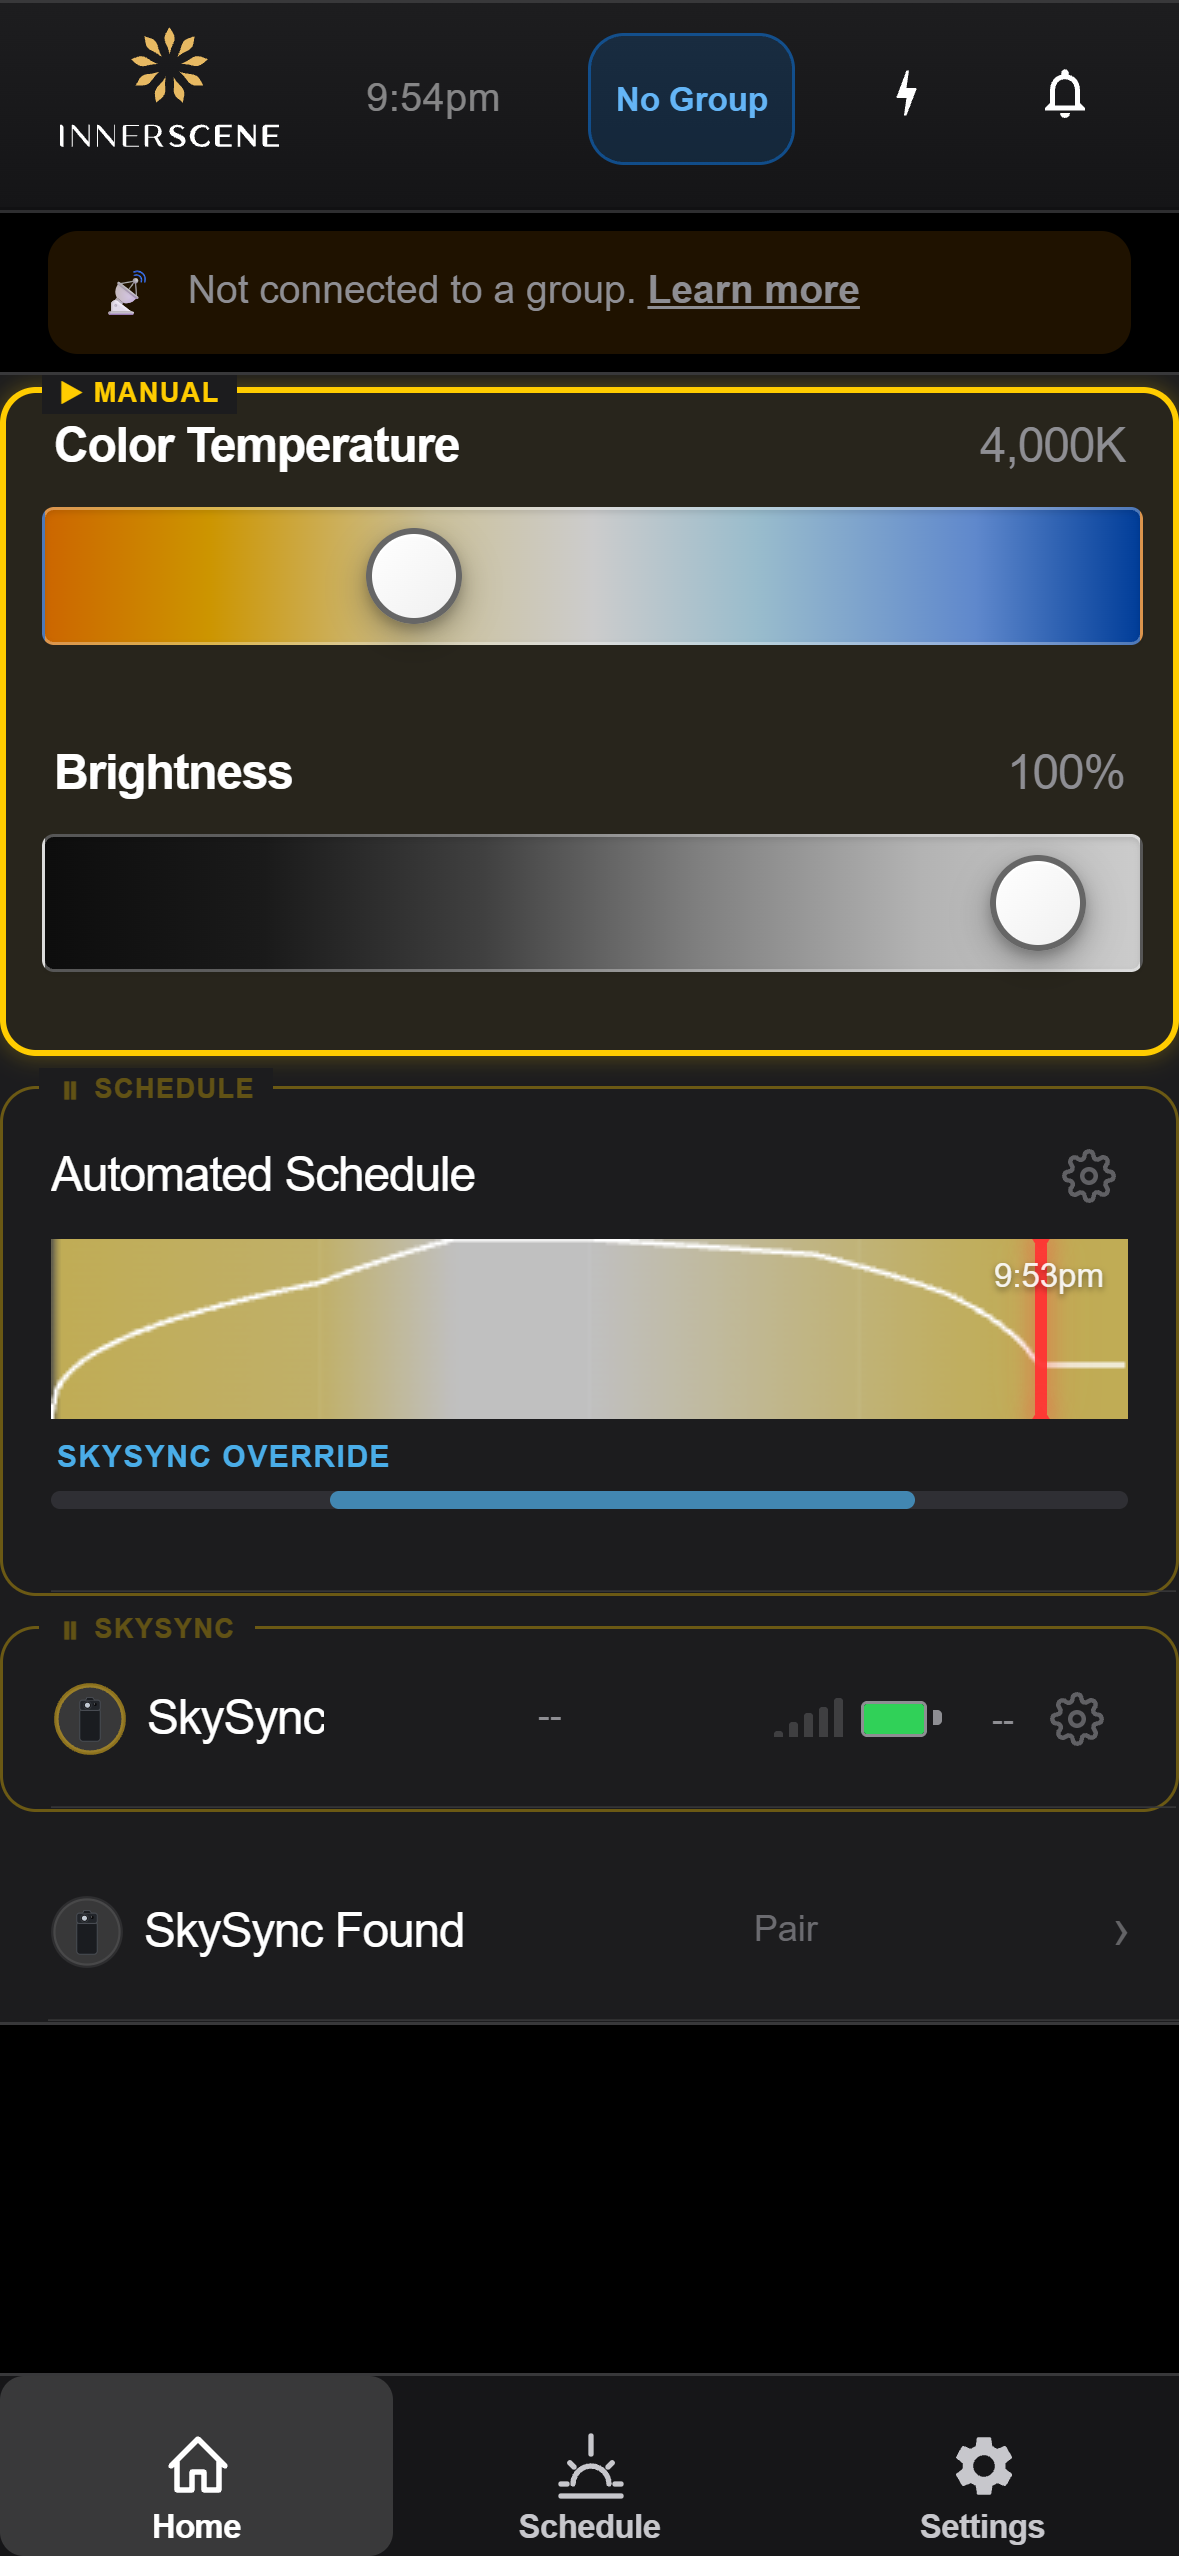
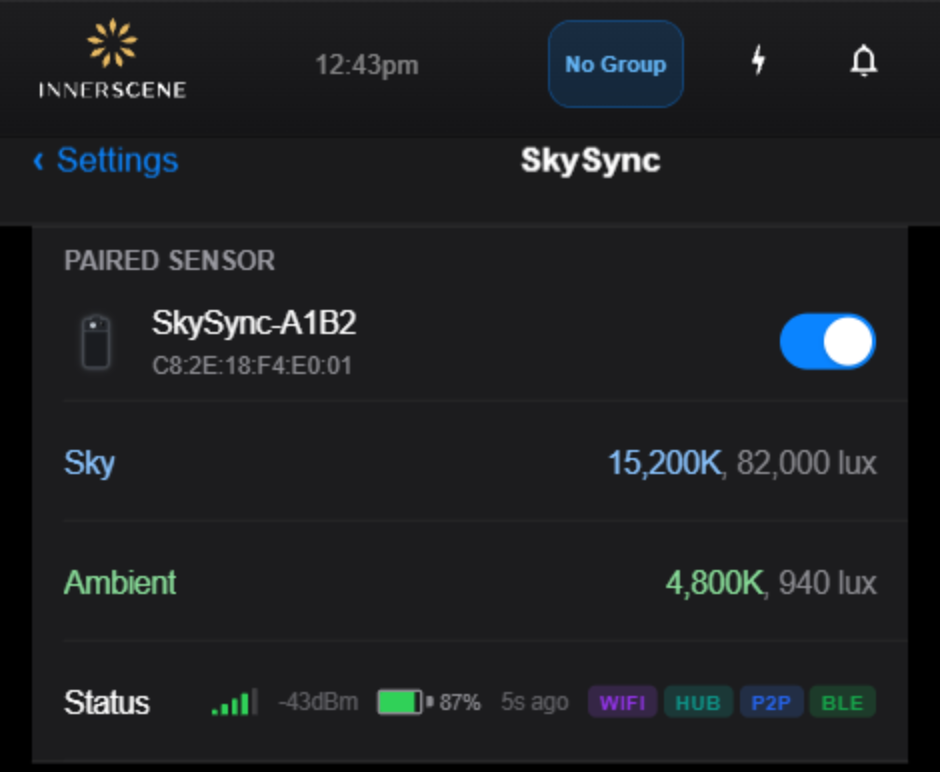
Once paired, the home screen shows a SkySync status row with live data from the sensor.
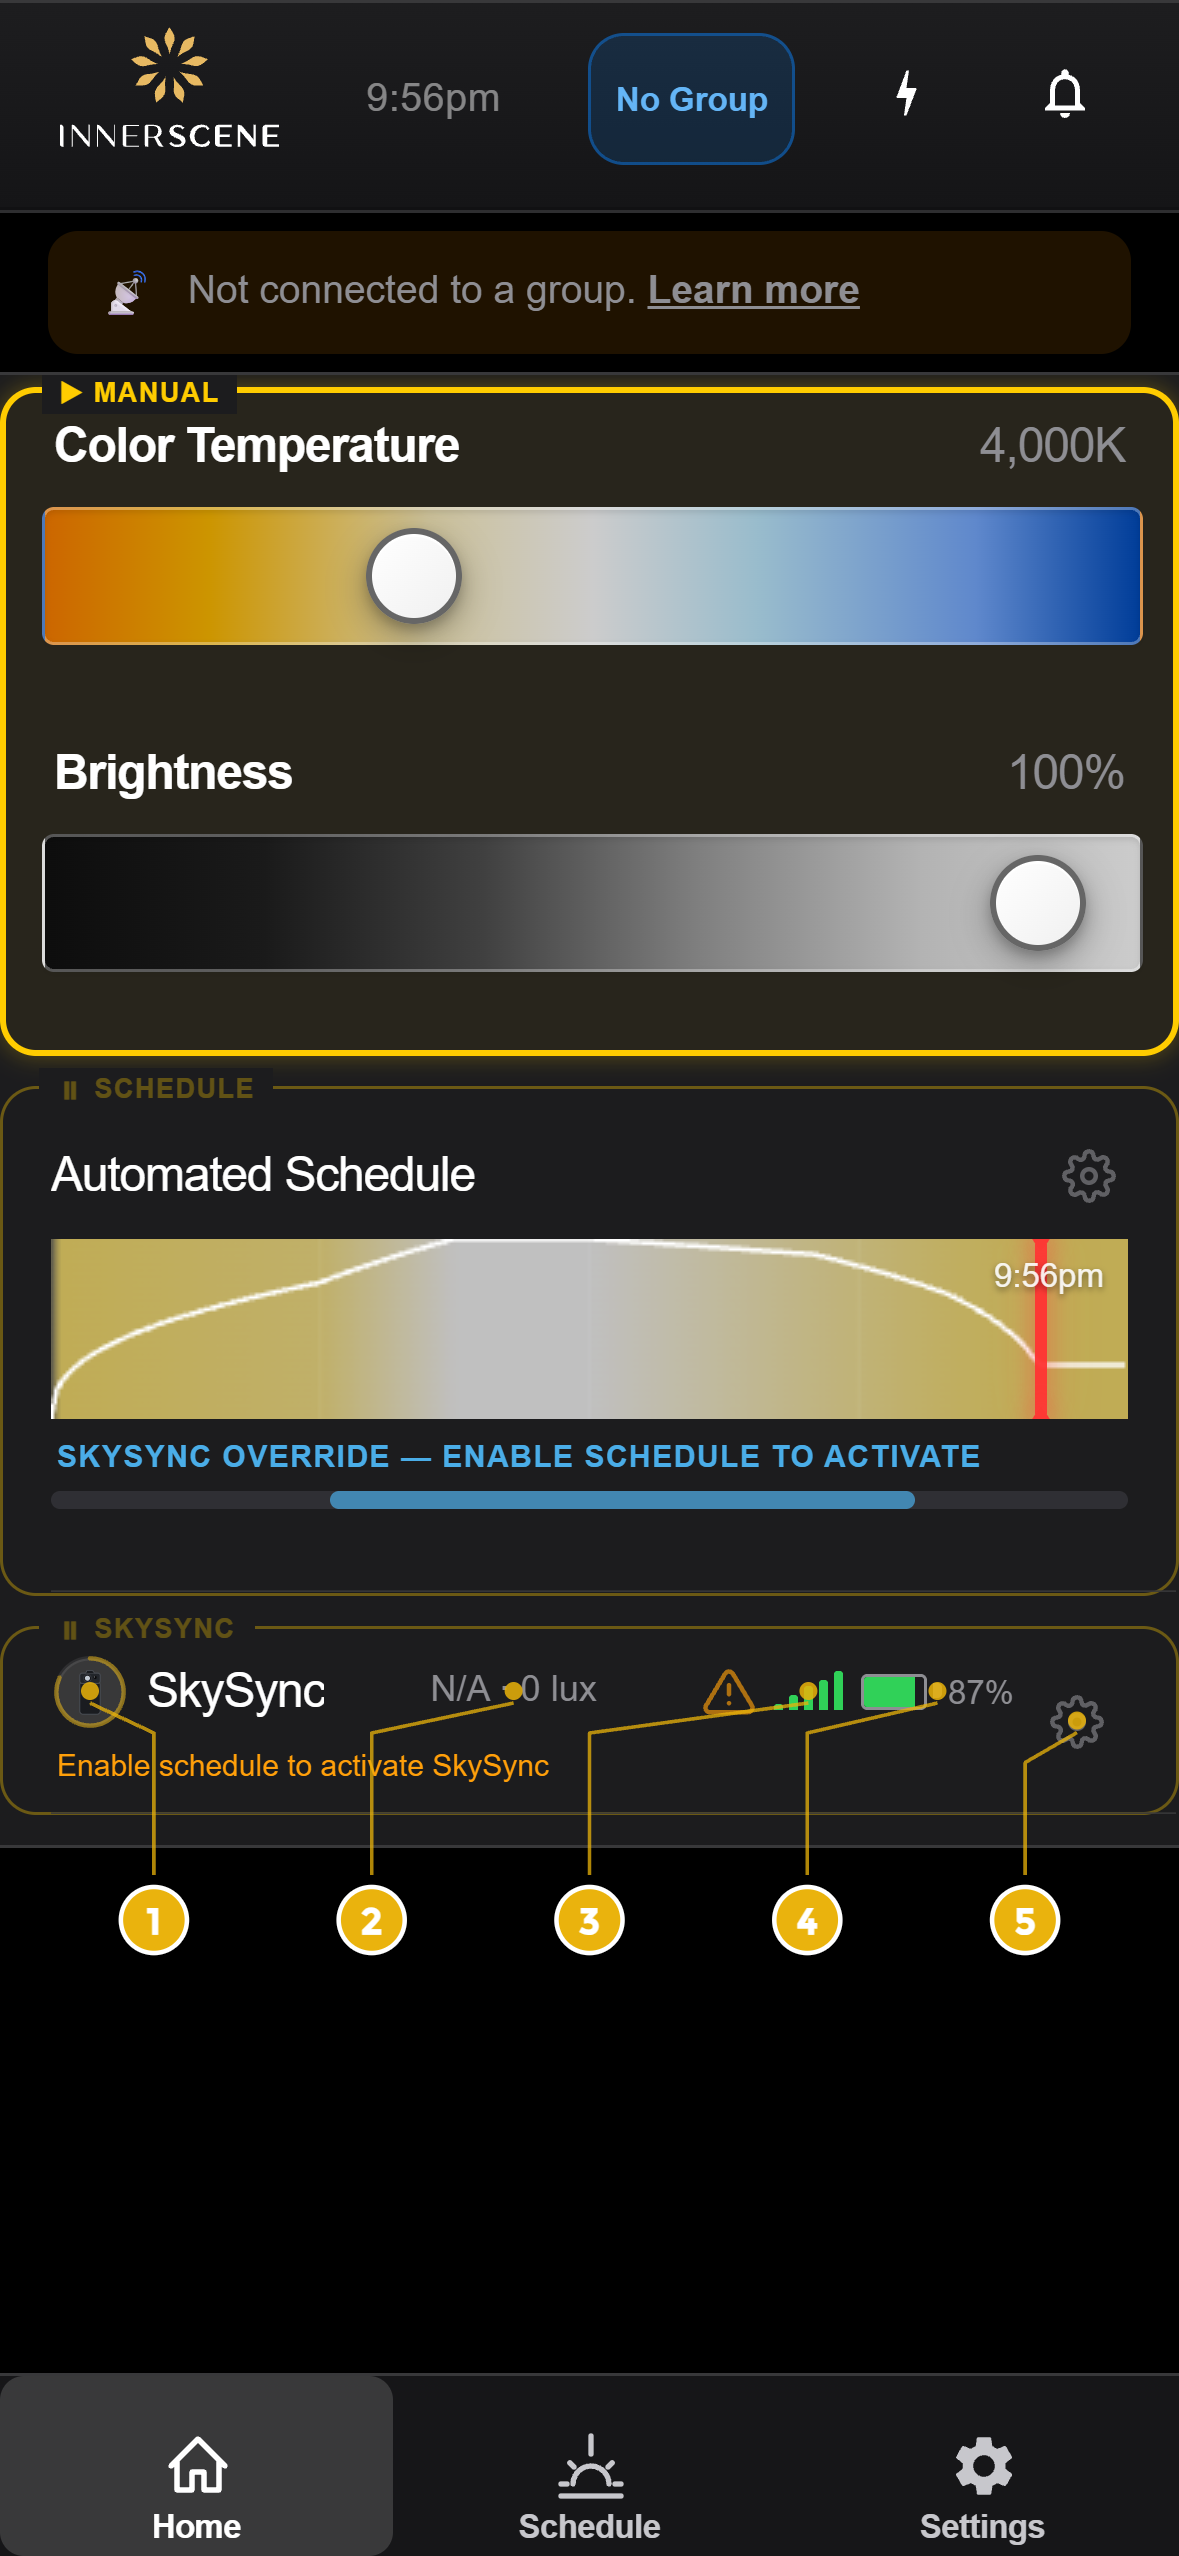
| # | Element | Description |
|---|---|---|
| 1 | Ring indicator | Countdown to the next sensor update |
| 2 | Live readings | Sky CCT, ambient CCT, and lux |
| 3 | Signal & battery | BLE signal strength and battery % (replace CR2477 below 10%) |
| 4 | Gear icon | Opens SkySync settings |
Step 3 — Pair SkySync to Your Fixture
- On your phone, join WiFi network
Innerscene-... - Default password:
innerscene - Open
172.30.0.1in your browser - Or use the Innerscene Studio app
Firmware Update (If Needed)
If your fixture firmware is older than v2.0.61, update before pairing. Updating also unlocks higher CCT support.
Innerscene-..., password: innerscene).Do You Need the Mini Hub?
SkySync pairs directly with your fixture over Bluetooth at up to 30ft. If the fixture is within range of the window, it can follow the sky on its own and the Mini Hub is optional. The signal bars on the Home screen tell you which case you're in.
After pairing (Step 3), find the SkySync row on the Home screen and read its signal-strength bars (element 3, p.3). Watch it for a minute or two.
| What you see | What it means |
|---|---|
| Sufficient signal 2 or more bars, steady readings |
Direct Bluetooth is working. Mini Hub not needed — skip ahead to Activating Schedule + SkySync (p.6). |
| Weak signal only 1 bar, or occasional "Sensor offline" |
Reception is marginal (distance or walls in the way). Add the Mini Hub below for reliable, drop-free coverage. |
| No bars "SkySync Found" never appears, or frequent "Sensor offline" |
The fixture can't hear SkySync directly. Mini Hub required — set it up below. |
The Mini Hub ships with every SkySync, so adding it costs nothing but a few minutes of setup.
- You have fixtures in other rooms — the Hub's network relay covers the whole building
- You want a redundant path so the sky keeps tracking even if the direct Bluetooth link drops
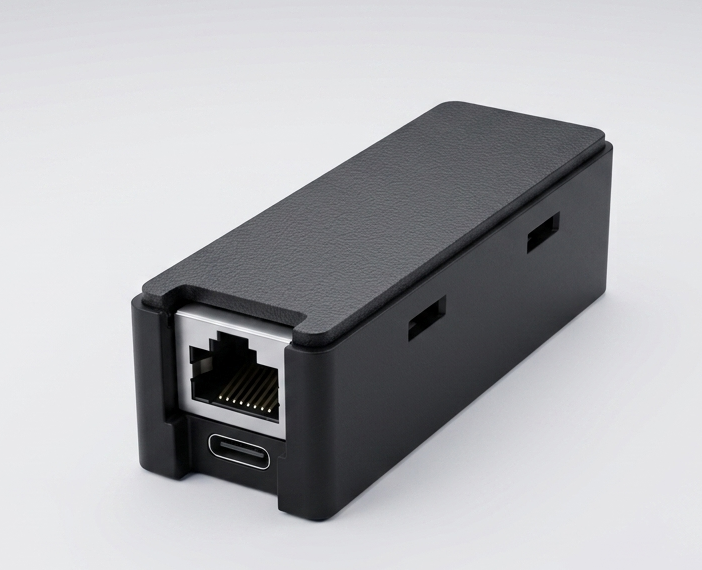
Step 4 — Set Up Mini Hub (If Needed)
The Mini Hub extends SkySync range from 30ft direct to 100ft+ over your network.
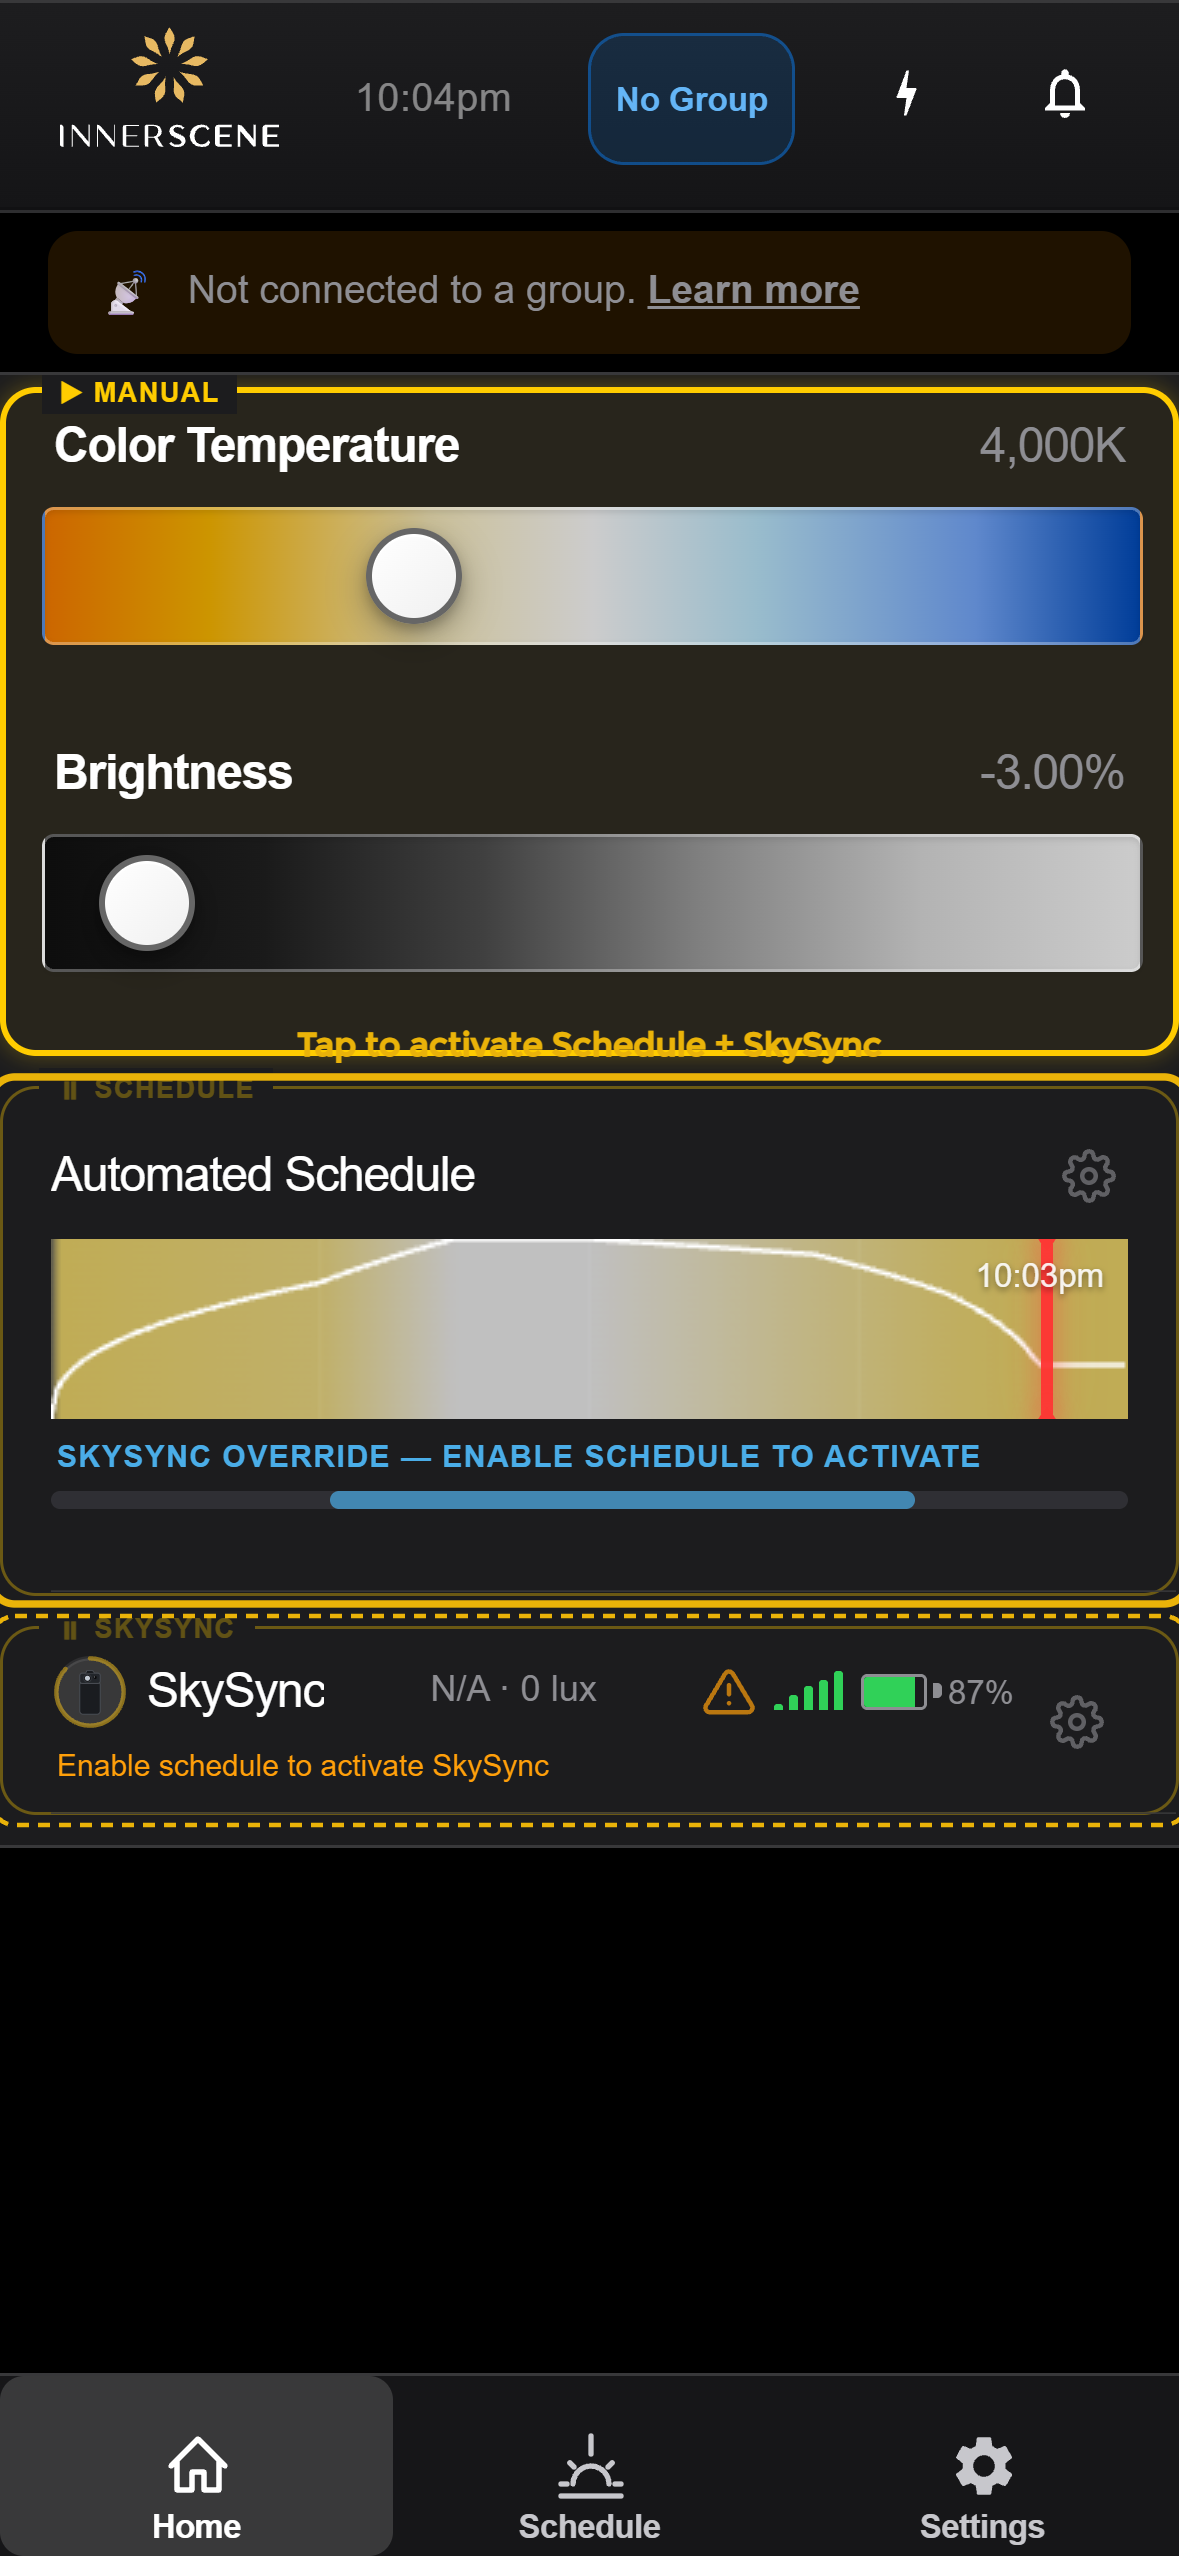
Activating Schedule + SkySync Mode
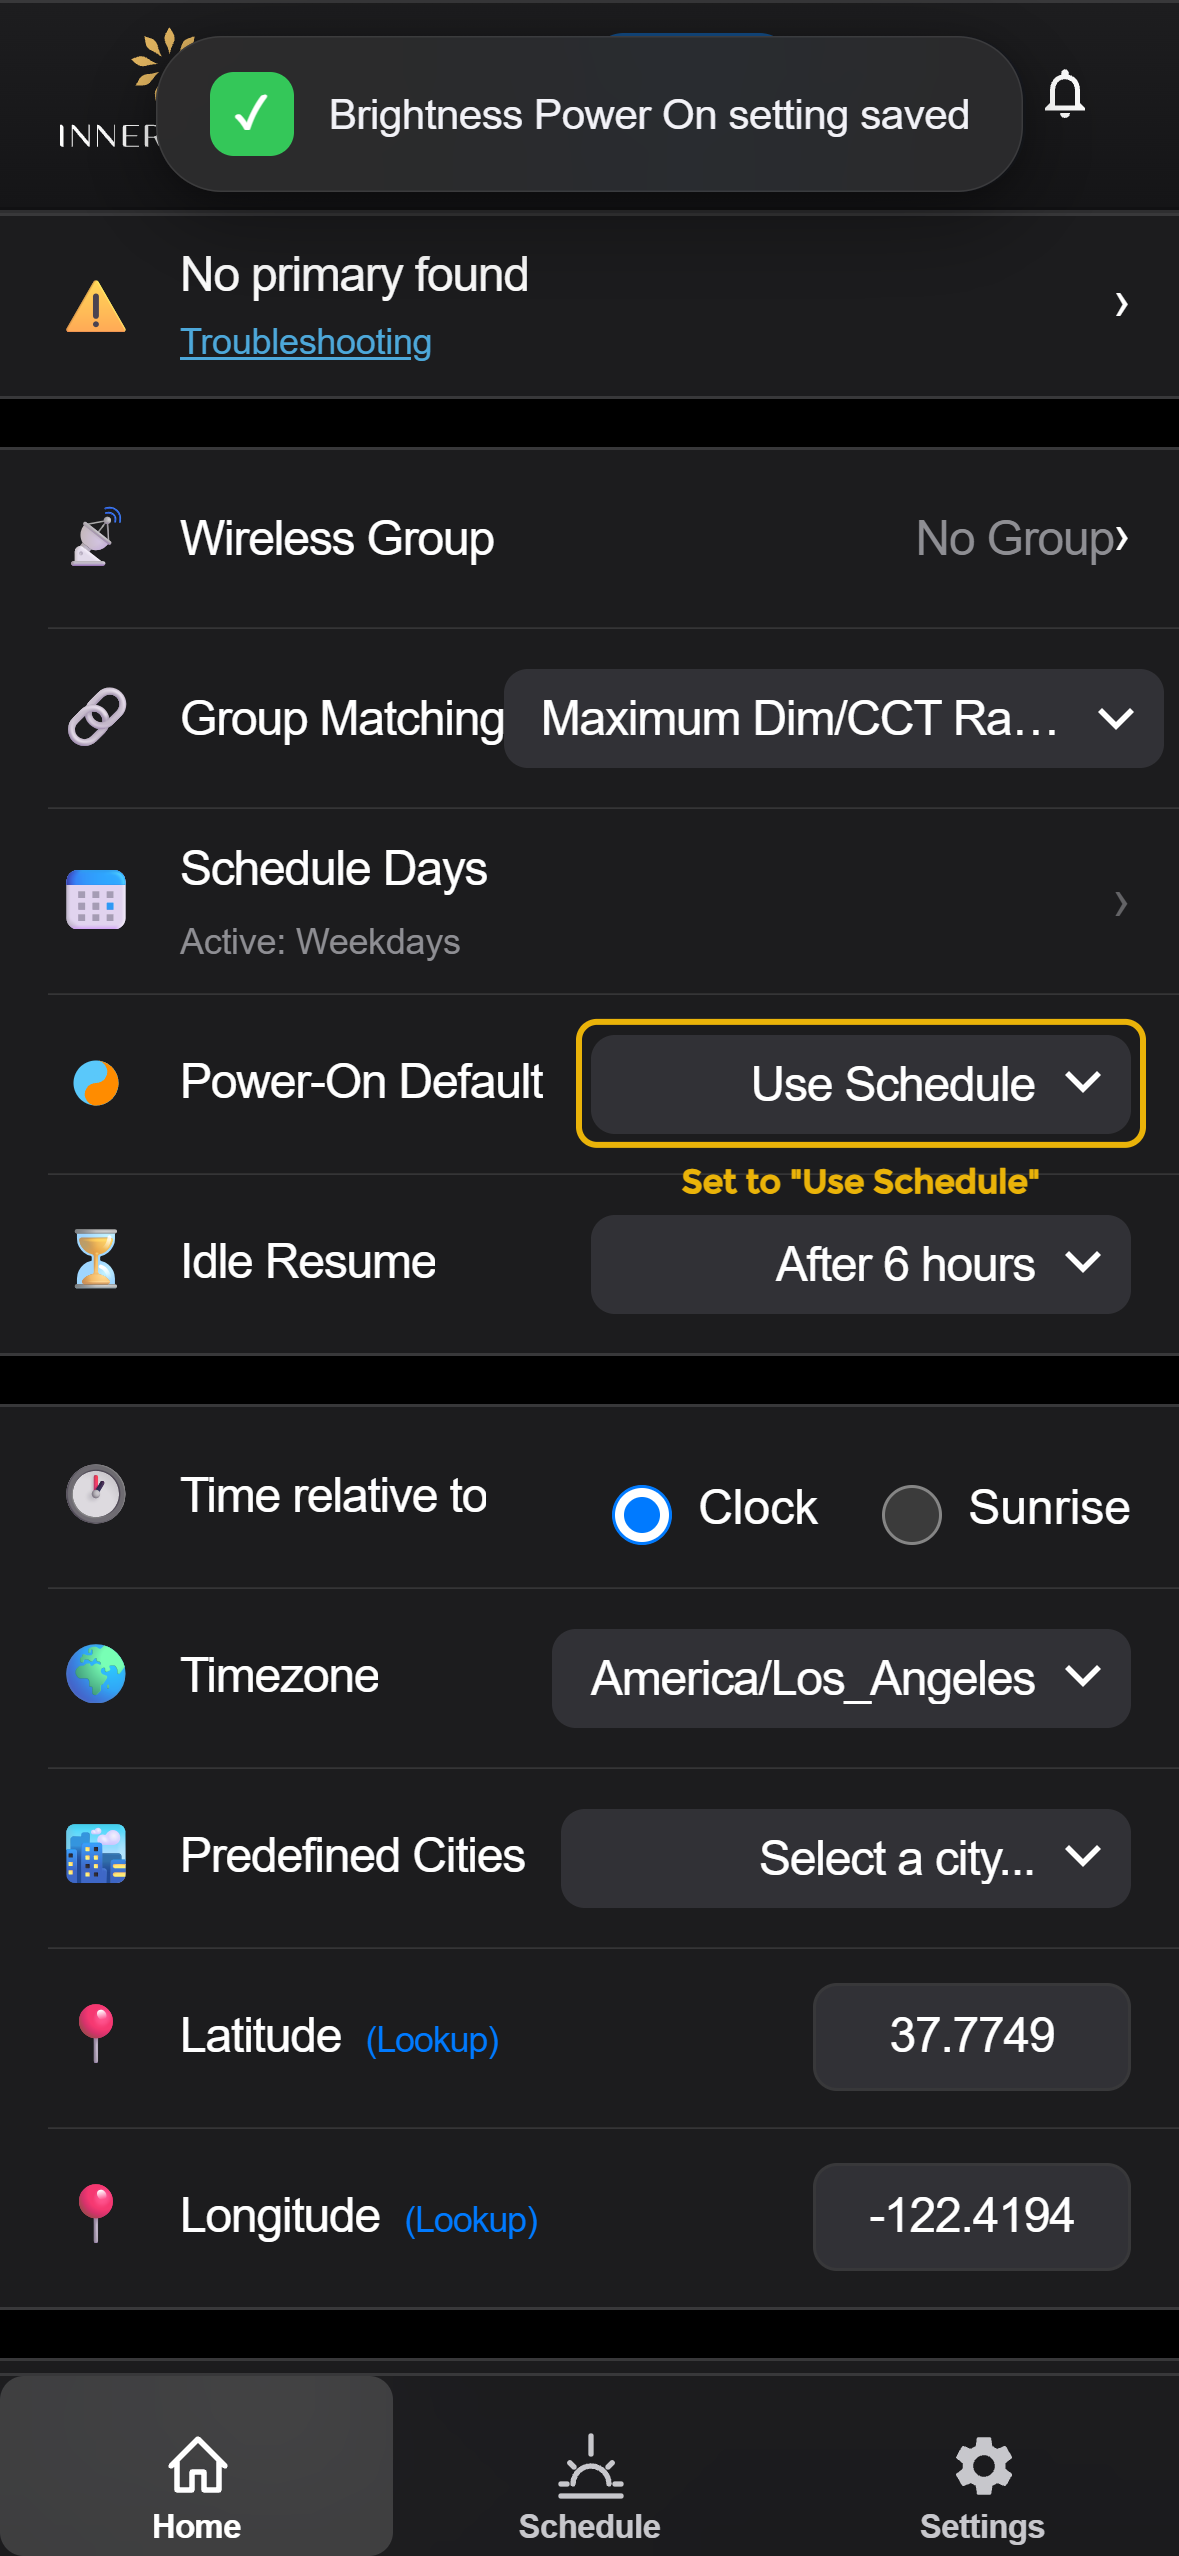
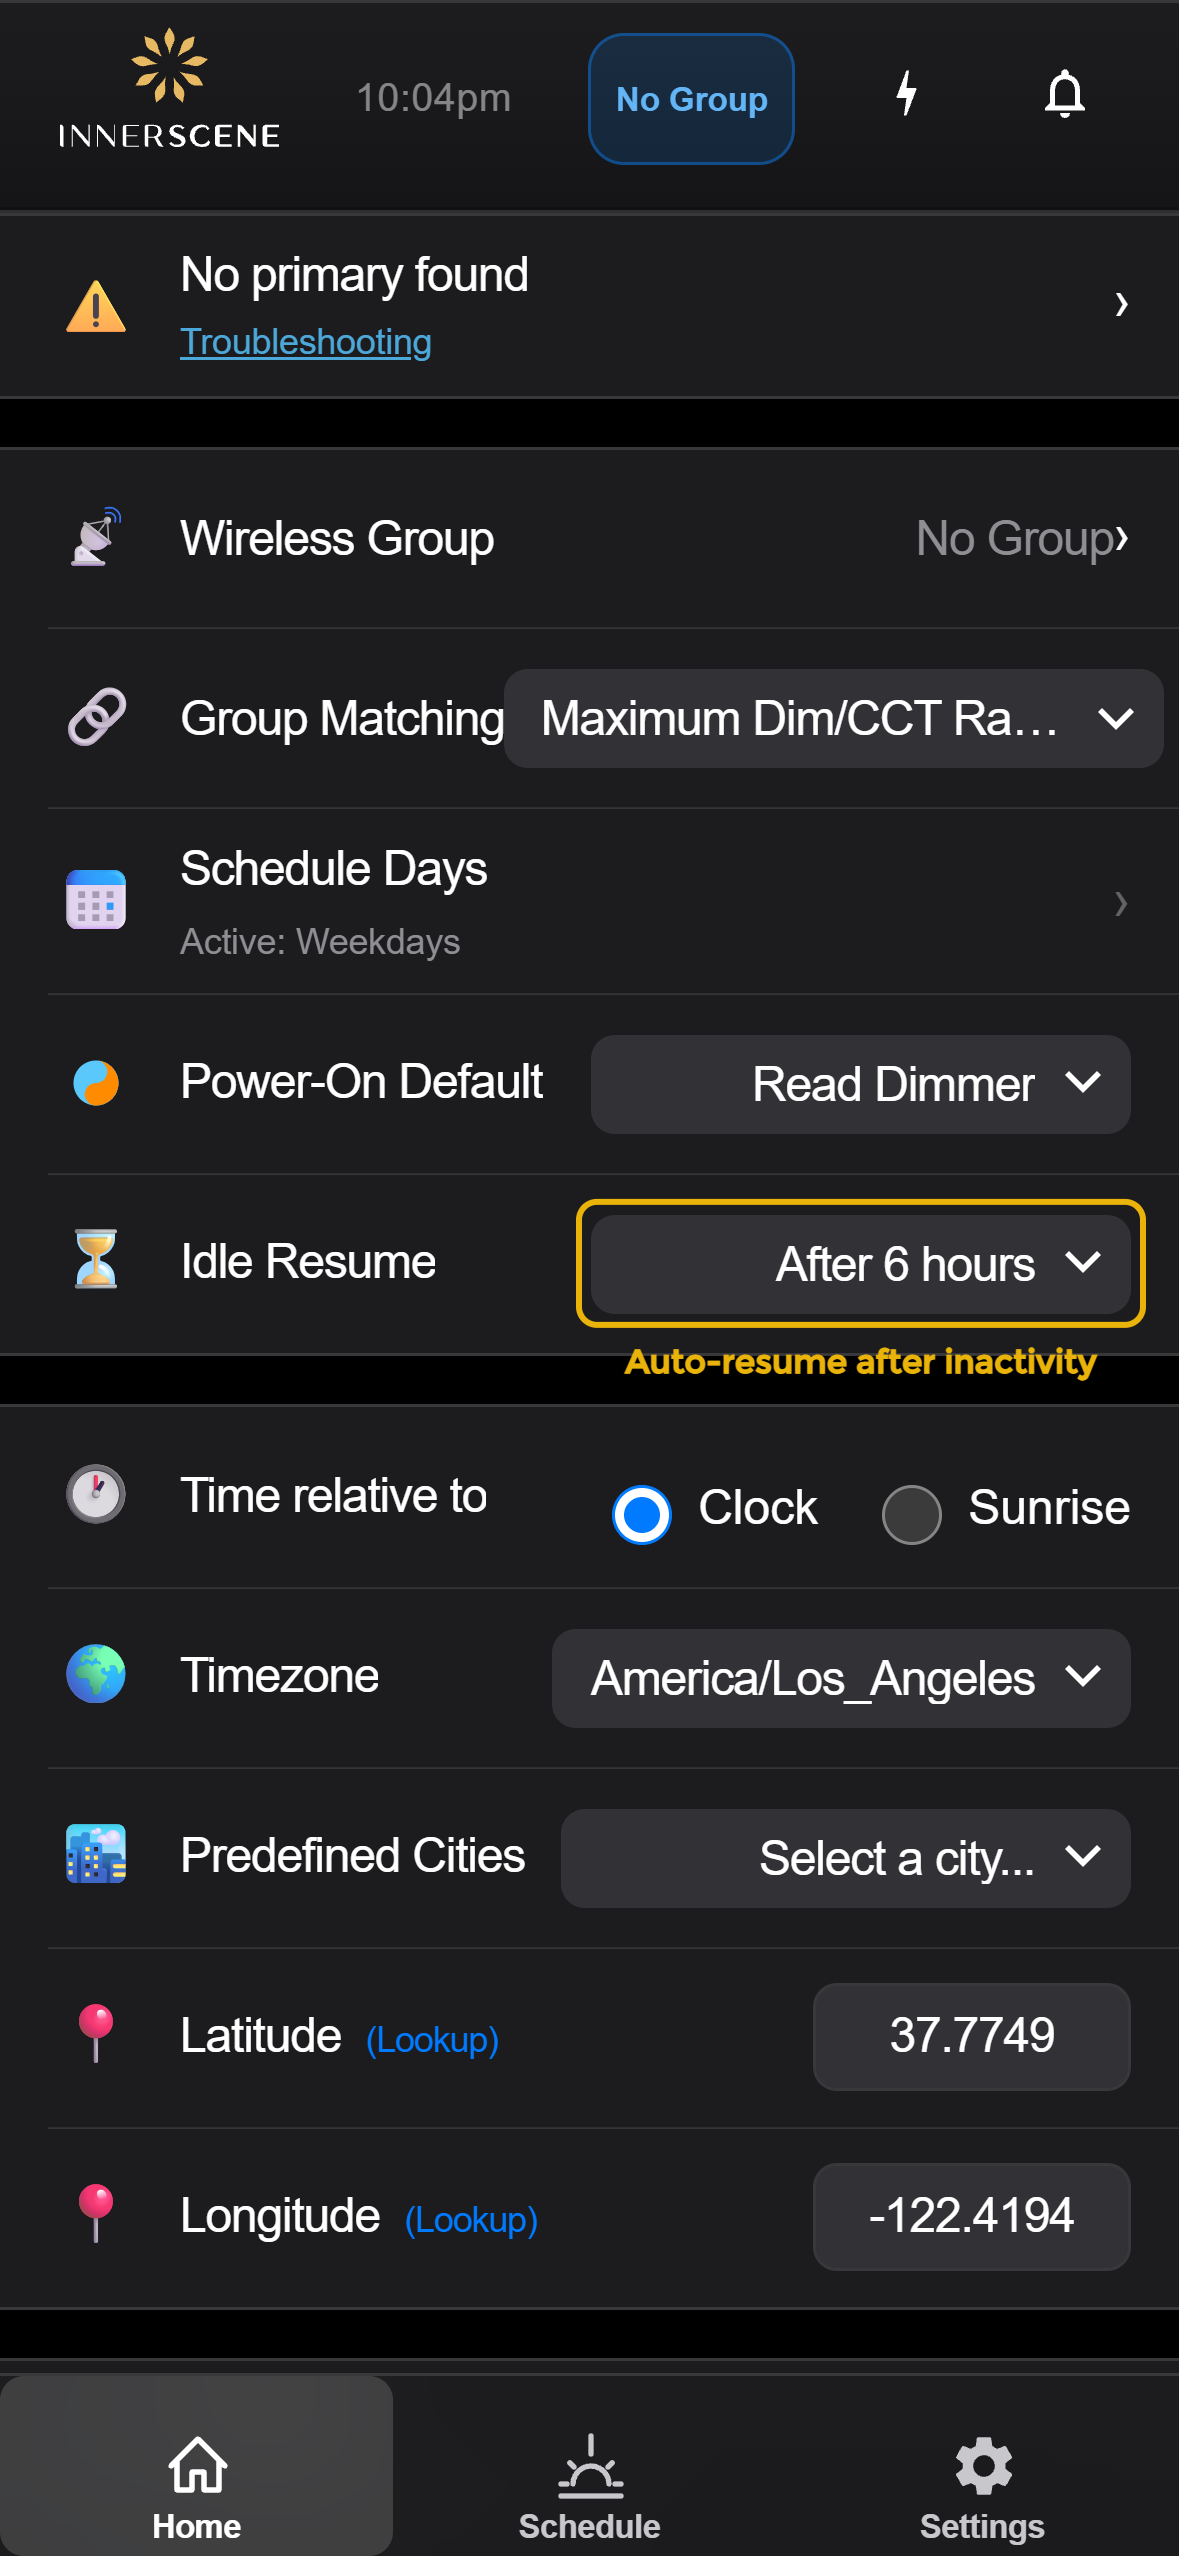
Schedule + SkySync mode combines your programmed schedule with real-time sky tracking. There are three ways to activate it:
Method 1: Set Power-On Default to “Use Schedule”
Settings → Power-On Default → Use Schedule. Fixture automatically starts in Schedule + SkySync mode on power-up. Recommended for permanent installations.
Method 2: Enable Idle Resume
Settings → Idle Resume → choose a timeout (15 min, 30 min, or 1 hr). After inactivity, the fixture automatically returns to Schedule + SkySync mode.
Method 3: Tap the Schedule Card
On the Home screen, tap the Schedule + SkySync card to activate immediately.
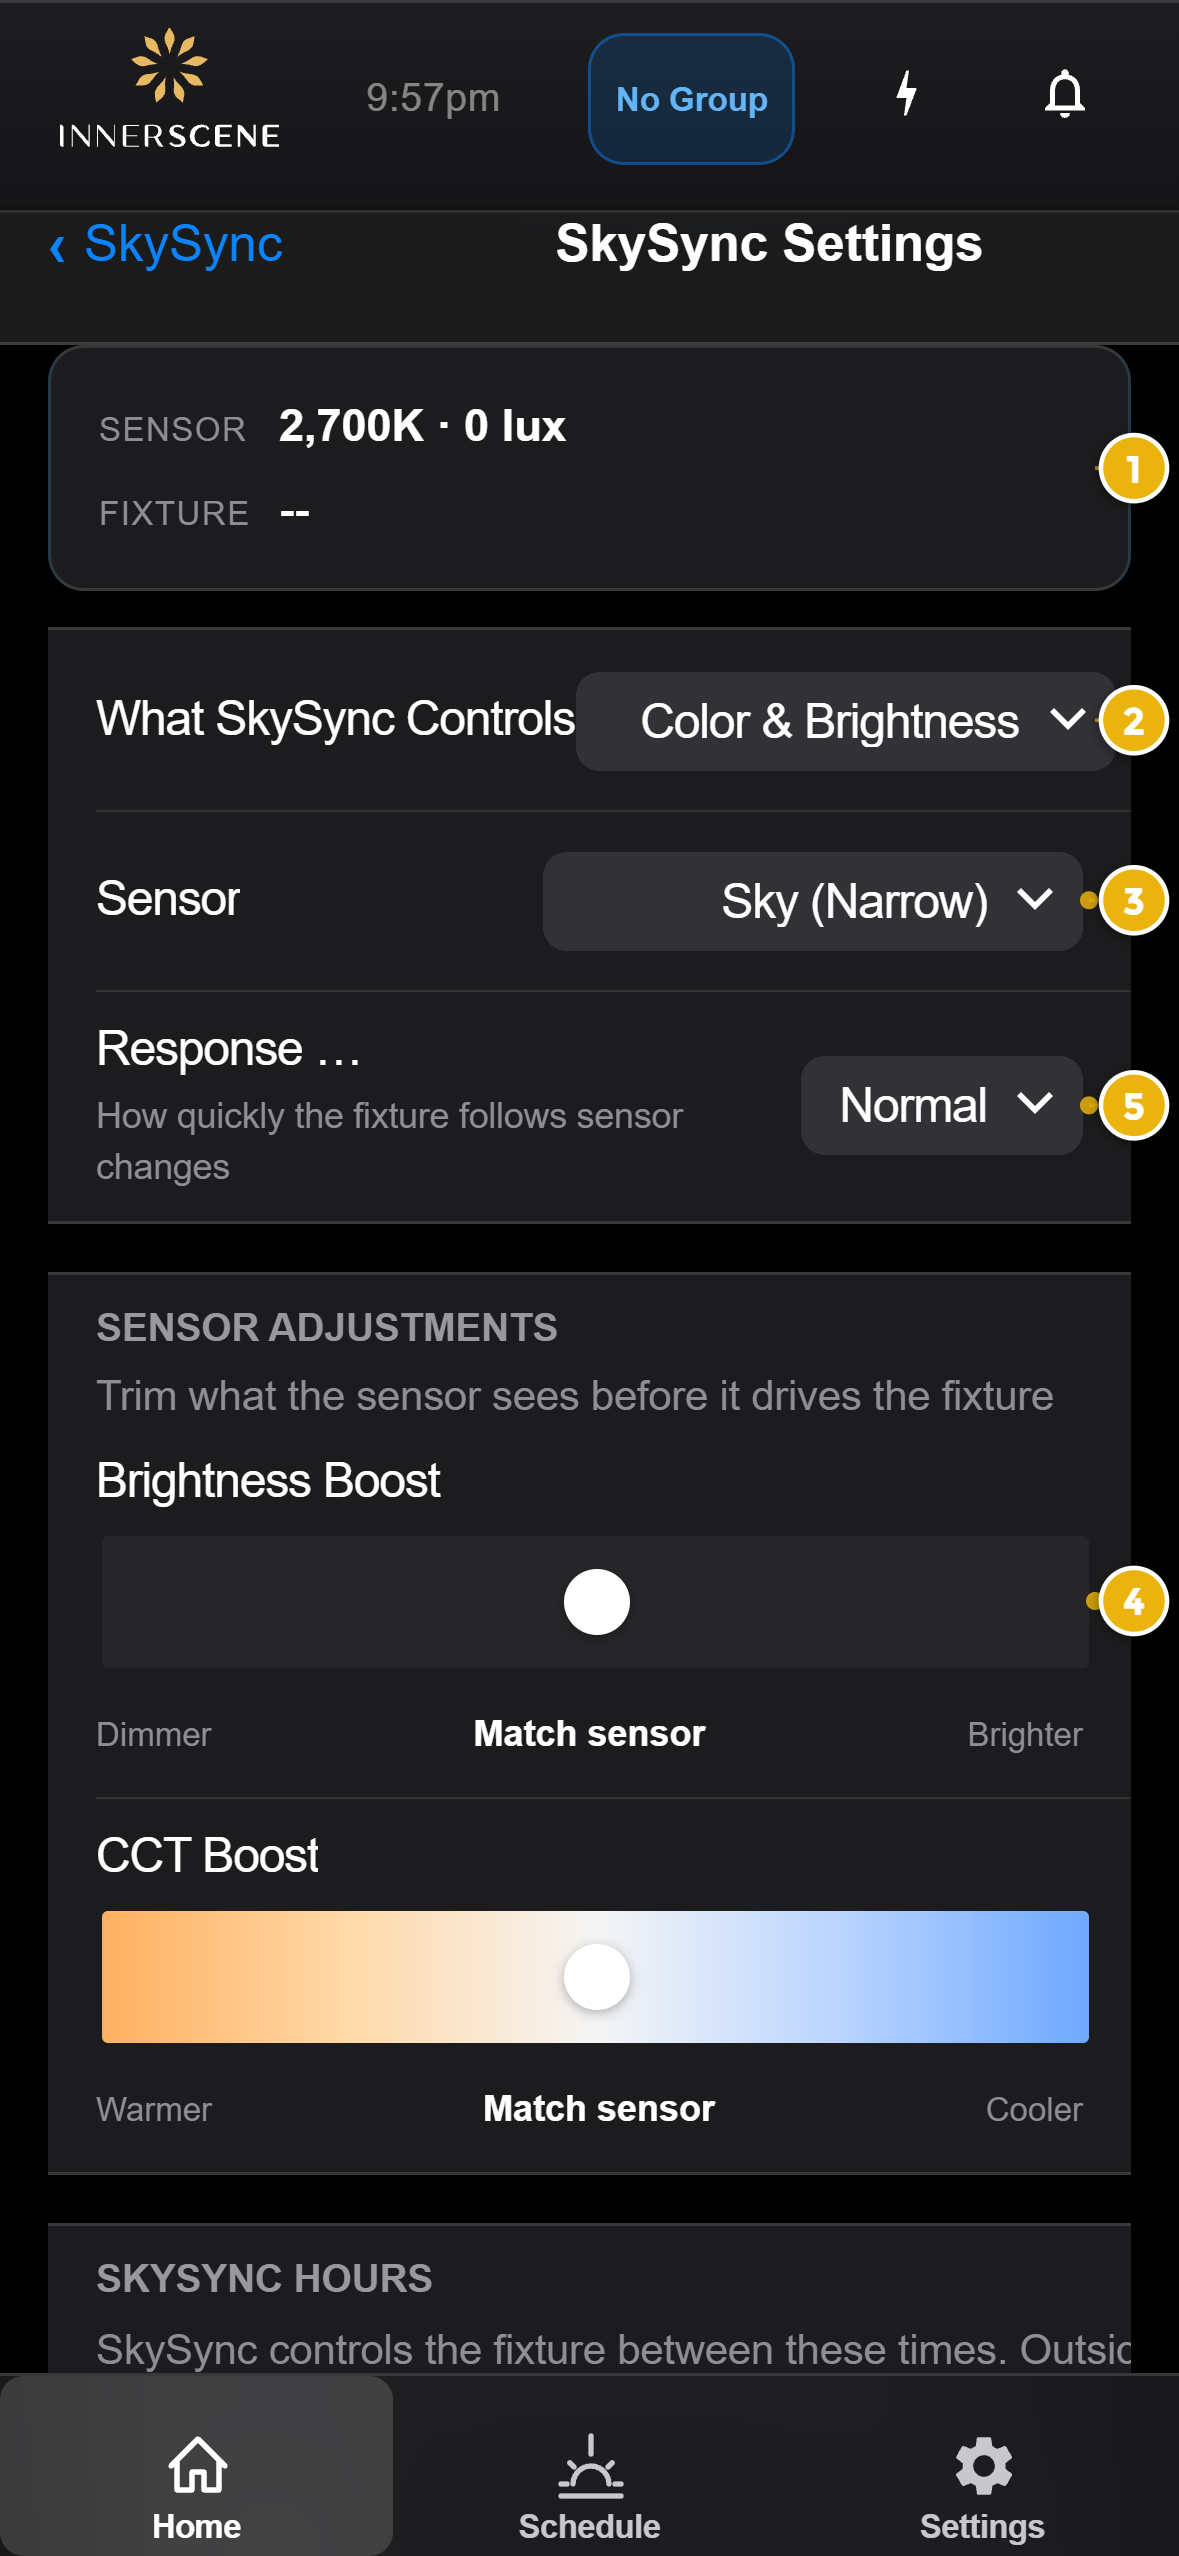
SkySync Settings
Access SkySync settings from Home → SkySync row (gear icon) or Settings → SkySync → SkySync Settings.
1 Live Preview Strip
Shows real-time sensor reading and current fixture output at the top of the settings page.
2 What SkySync Controls
| Option | Description |
|---|---|
| Color & Brightness Default | SkySync drives both CCT and brightness — fixture fully follows the sky |
| Color Only | SkySync sets CCT only; brightness stays at schedule/manual level |
| Brightness Only | SkySync sets brightness only; CCT follows the schedule |
3 Sensor Selection
SkySync has two sensor windows:
| Sensor | FOV | Best For |
|---|---|---|
| Sky (Narrow) Default | 10° | Capturing blue sky color directly |
| Ambient (Wide) | 180° | Overall room-level light including reflections |
| Average Both | — | Blended reading of both sensors |
The narrow sky sensor (black cylinder) captures the true color of the sky. The wide ambient sensor (white diffuser) measures surrounding light.
4 Response Speed
| Speed | Transition Time | Effect |
|---|---|---|
| Fast | ~3 seconds | Fixture closely tracks rapid sky changes (clouds passing) |
| Normal Default | ~10 seconds | Smooth, natural transitions |
| Slow | ~45 seconds | Very gradual changes; barely noticeable to occupants |
Sensor Adjustments
Trim what the sensor sees before it drives the fixture.
Brightness Boost
Adjusts fixture brightness relative to sensor readings.
| Dimmer | ← — slider — → | Brighter |
Default: center (match sensor). Useful for compensating for tinted windows that reduce perceived brightness.
CCT Boost
Shifts the color temperature warmer or cooler relative to sensor readings.
| Warmer | ← — slider — → | Cooler |
Default: center (match sensor). Useful for fine-tuning color appearance to your preference.
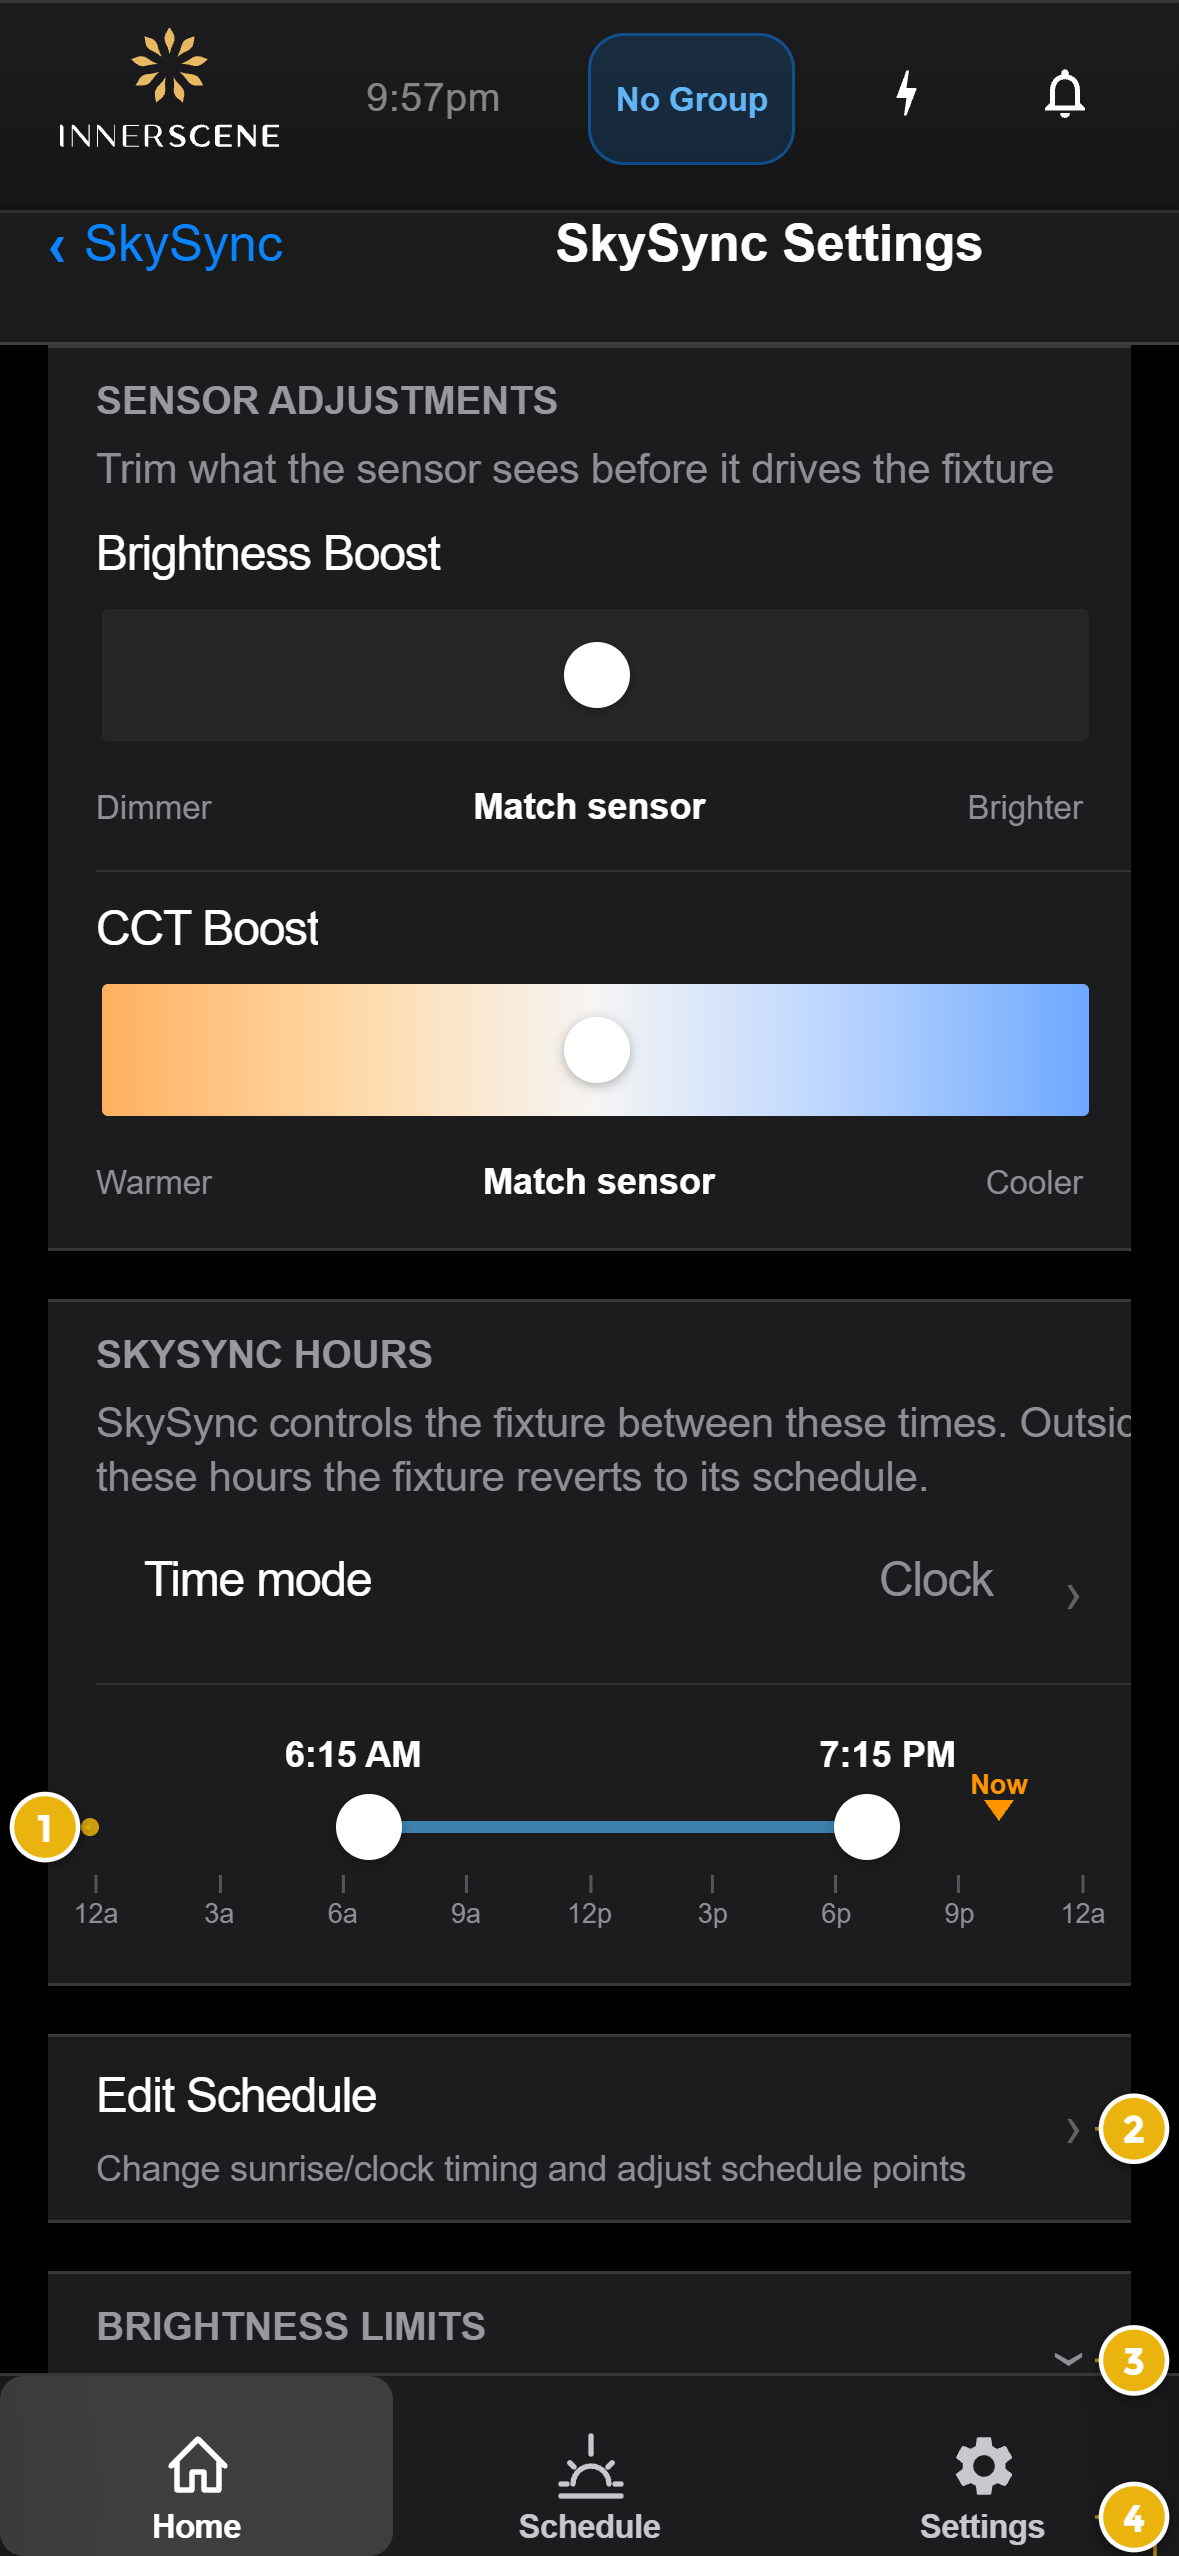
1 Operating Hours
Define when SkySync is active. Outside these hours, the fixture reverts to its schedule.
| Setting | Default | Description |
|---|---|---|
| Time mode | Clock | Clock: fixed times. Sunrise: relative to sunrise/sunset. |
| Start time | 6:15 AM | SkySync begins controlling the fixture |
| End time | 7:15 PM | SkySync stops; fixture follows schedule |
- "Outside operating hours" — current time is outside your set window
- "Low light" — ambient light too low (dawn/dusk/night)
- "Sensor offline" — no data received for 10+ minutes
- "SkySync paused" — fixture is in manual mode
Brightness & CCT Limits
Constrain how bright and how warm/cool SkySync drives the fixture, and trim its response before it reaches the light.
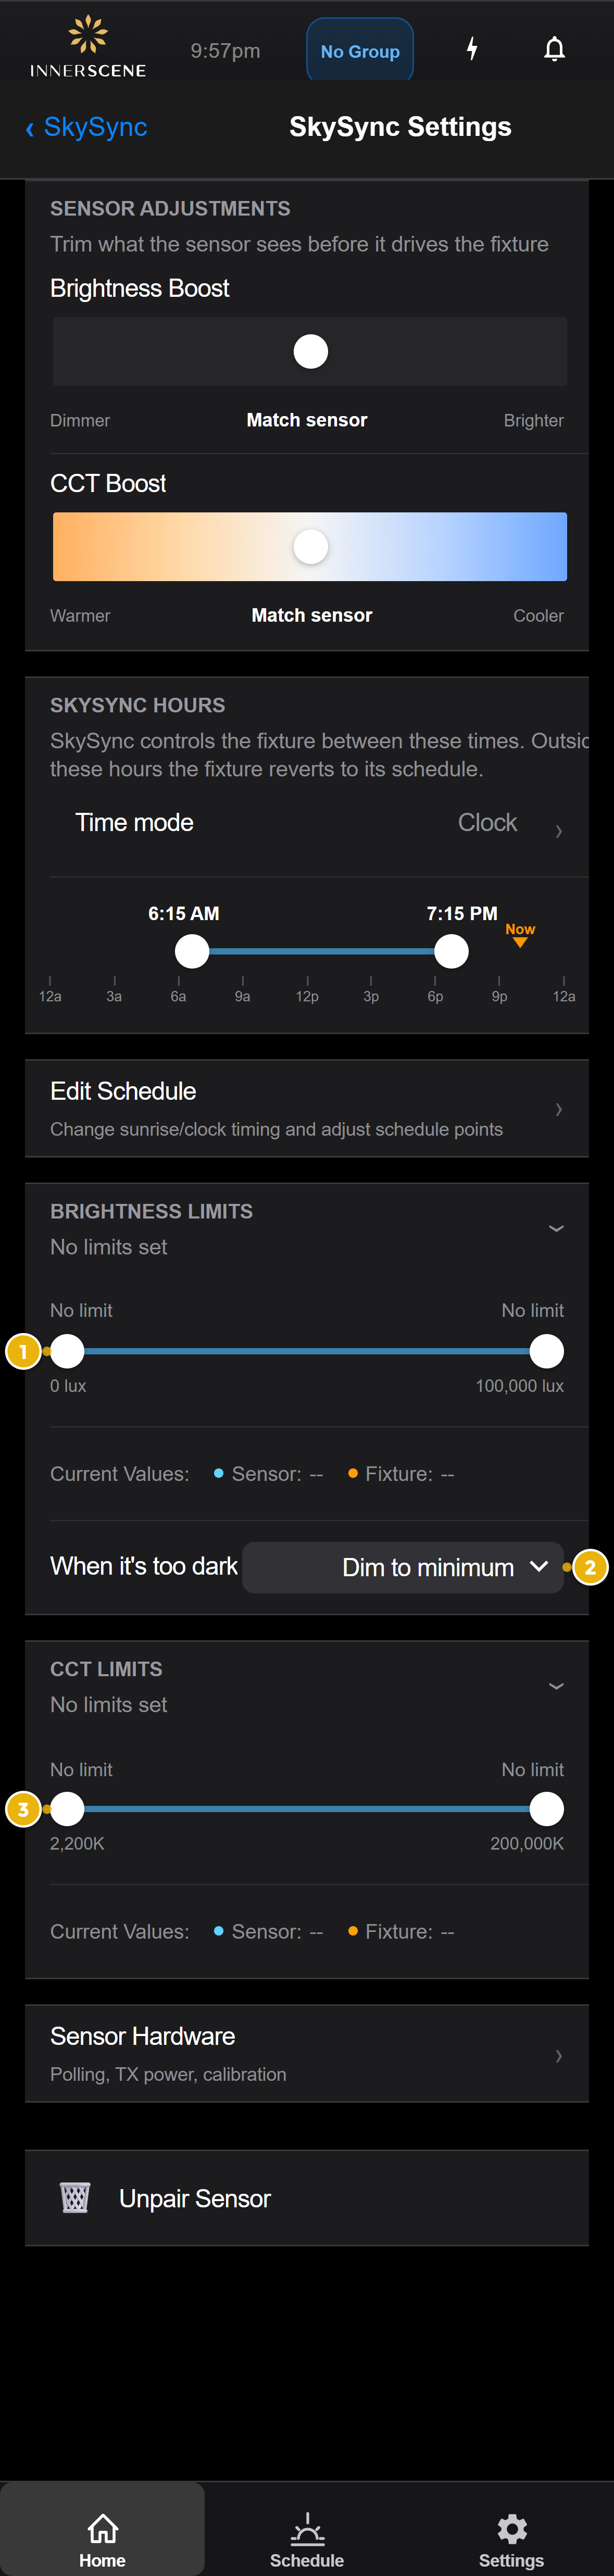
Brightness Limits
Set a floor and ceiling on fixture brightness. The Min/Max Lux slider defines the range.
When Too Dark: dim to minimum, follow the schedule, or use a fixed warm light (e.g., 2700K).
CCT Limits
The Min/Max CCT slider constrains the fixture's color temperature range (e.g., a 3000K minimum prevents very warm light at sunset).
Tint Correction
The Brightness Boost and CCT Boost sliders bias the output brighter/dimmer or warmer/cooler than the raw sensor reading. Keep them centered to track the sky exactly; nudge them to compensate for tinted glass or personal preference.
Innerscene Mini Hub
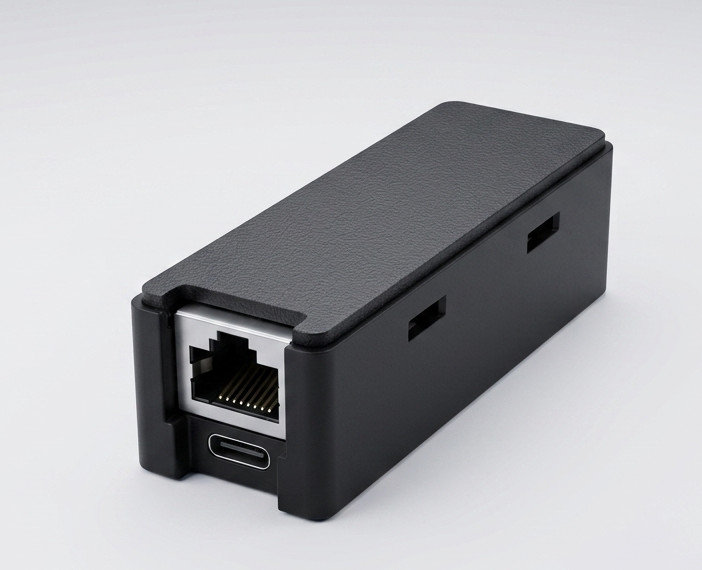
The Mini Hub is a compact gateway that ships with every SkySync. It listens for SkySync's Bluetooth signal and rebroadcasts it three ways at once, so fixtures the sensor can't reach directly still stay in sync:
- Higher-power Bluetooth rebroadcast (a stronger radio than the sensor's)
- Innerscene Wireless mesh (fixture-to-fixture, no network needed)
- UDP broadcast over your network (AES-encrypted, port 65003)
When You Need the Mini Hub
Power Options
| Method | What You Need | Best For |
|---|---|---|
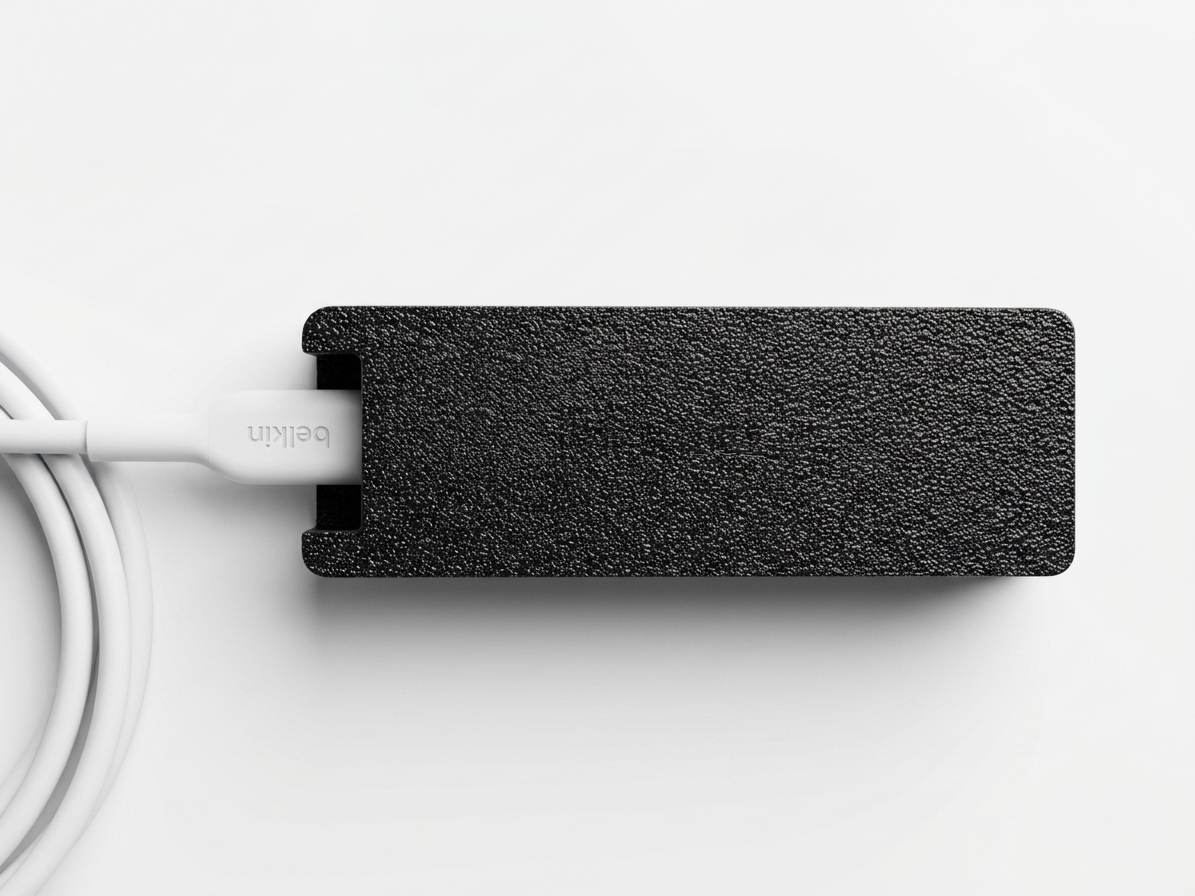
| USB-C | Power supply included in the box | Quick setup, flexible placement |
| Power over Ethernet (PoE) | PoE switch or injector (IEEE 802.3af) | Clean single-cable install — power + data in one |
Power consumption: 0.5W. Power the Mini Hub from the included USB-C supply or over PoE; any standard USB-C charger also works.
Network Connection
Option A: Ethernet (Recommended)
- Plug an Ethernet cable from your router/switch into the Mini Hub
- The Hub picks up a DHCP address, then fixtures on the same network receive SkySync data via UDP broadcast
Option B: WiFi
- Power on the Mini Hub (USB-C, no Ethernet)
- On your phone, join:
Innerscene-hub-XXXX - Password:
innerscene - Open
172.30.0.1in your browser - Go to WiFi settings → Connect to WiFi
- Select your network, enter password, tap Join
Using the Network Path: Put the Hub and Your Primary Fixture on One WiFi
For the network (UDP) path, the Mini Hub and your Circadian Sky primary fixture must be on the same network and subnet, each with a DHCP-assigned IP (the default on any router). UDP broadcast does not cross routers, guest networks, or client-isolated access points.
1. Connect the Mini Hub to WiFi
- Power the Hub over USB-C (no Ethernet).
- Join
Innerscene-hub-XXXX(passwordinnerscene). - Open
172.30.0.1→ WiFi settings → Connect to WiFi. - Select your network, enter the password, tap Join.
2. Connect the Primary Fixture to the Same WiFi
- Connect to the fixture (
Innerscene-...AP or the Innerscene Studio app). - Go to Settings → WiFi → Connect to WiFi.
- Choose the same network as the Hub, enter the password, tap Join.
- The WIFI badge appears on the SkySync page once data arrives over the network.
LED Indicators
| LED | State | Meaning |
|---|---|---|
| Power | Solid on | Hub is powered and running |
| Ethernet | Blinking | Active network traffic (data relay in progress) |
| Ethernet | Off | No Ethernet cable connected (using WiFi or not connected) |
Mounting & Placement
- Mount using a single screw through the hole in the enclosure
- Place within 20ft of SkySync for reliable BLE reception
- Place within 50ft of fixtures for wireless relay, or connect to your network for longer distances
- Ideal location: near a window with SkySync, close to a network drop
Multi-Fixture Setup
Primary & Secondary Fixtures
Innerscene fixtures use a wireless group system where one Primary fixture coordinates with Secondary fixtures.
| Role | SkySync Behavior |
|---|---|
| Primary | Pairs with SkySync directly. Receives and distributes sky data. |
| Secondary | Receives SkySync data automatically via mesh. No setup needed — pre-provisioned by Innerscene. |
Key Points
- Only the Primary fixture needs to pair with SkySync
- Multiple Primaries (e.g., in different rooms) can all pair to the same SkySync sensor
- Secondaries receive SkySync data through the mesh — no action required
- All fixtures relay SkySync data via Innerscene Wireless mesh (TTL-based, up to 2 hops by default) and UDP broadcast if on WiFi
- Fixtures also relay Mini Hub broadcasts, extending coverage further
Communication Modes — Three Ways Data Reaches Your Fixtures
SkySync data can reach a Circadian Sky fixture over three paths. Fixtures accept all of them at once, so extra paths add redundancy rather than compete. The SkySync page shows a reception badge for every path seen in the last two minutes, so you can tell exactly how data is arriving.
1. Direct
Range: ~30ft
SkySync → fixture over Bluetooth LE. No hub, no network. Best for a single room with the fixture within range of the window.
2. Mini Hub Rebroadcast
Range: 20ft to hub + 50ft out
SkySync → Mini Hub → fixtures via higher-power BLE plus Innerscene Wireless mesh (P2P). Just add power, no network. The hub sits within BLE range of SkySync.
3. Network (UDP over WiFi/LAN)
Range: Whole building (LAN)
SkySync → Mini Hub → LAN → fixtures via AES-encrypted UDP broadcast (port 65003). Best for multiple rooms. Hub and primary must share one network (p.11).
Troubleshooting
| Symptom | Possible Cause | Solution |
|---|---|---|
| "SkySync Found" doesn't appear on home screen | Sensor out of range, not transmitting, or paired to another fixture | Press the SkySync button to trigger transmission. Move within 30ft. Check battery level. |
| Weak signal (1 bar or dropping) | Distance or walls between SkySync and fixture | Move SkySync closer to the fixture, reduce obstructions, or use the Mini Hub for network relay instead of direct wireless. |
| CCT reads low on a clear day (<10,000K) | Interior light reflections or poor sensor aiming | Ensure the hood is fitted to block room light. Re-aim the sensor more steeply toward the sky. Test with room lights off. Reposition to reduce glass reflections from interior surfaces. |
| "Outside operating hours — using schedule" | Current time is outside your SkySync active window | Normal behavior. Adjust the operating hours slider in SkySync Settings if needed. |
| "Low light — using schedule" | Sensor lux below minimum threshold (dawn/dusk/night) | Normal behavior. Adjust brightness limits or "When too dark" action in Settings. |
| "Sensor offline — using schedule" | No SkySync data received for 10+ minutes | Press the SkySync button. Check battery (<10% = replace CR2477). Verify sensor is within range or Mini Hub is active. |
| Mini Hub not relaying data | Network misconfiguration | Verify Ethernet LED blinks. Confirm fixtures are on the same WiFi network/subnet as the hub. Restart the hub by removing and reapplying power. |
| Fixture not responding to SkySync | SkySync disabled, wrong mode, or old firmware | Check SkySync toggle is enabled. Verify firmware ≥ v2.0.61. Ensure control mode is set to "Automated (Schedule + SkySync)". |
| Colors look wrong compared to actual sky | Sensor aiming or interior reflections | Ensure the hood is fitted. Re-aim the sensor more steeply upward. Test with room lights off. Use the CCT Boost slider in SkySync Settings to fine-tune color. |
Battery Replacement
SkySync uses a standard CR2477 coin cell battery with 10+ year life. The battery level is shown on the home screen and SkySync page.
- Replace when the indicator shows below 10%
- Battery readings can be affected by temperature; accuracy is ±5%
- To access the battery, remove the front cover
- CR2477 batteries are widely available online and at electronics retailers
Factory Reset & Shipping Mode
| Action | How | Effect |
|---|---|---|
| Factory Reset | Press and hold the button for 5 seconds until LED confirms | Resets polling interval, TX power, and calibration to factory defaults. Does not unpair. |
| Shipping Mode | Tap the button 5 times within 5 seconds | Enters ultra-low-power standby (<1µA). Press the button to wake. Used for long-term storage. |
| Reboot | Press and hold for 10 seconds | Forces a cold restart of the sensor. |
SkySync Sensor Specifications
| Sensors | |
|---|---|
| Sky Sensor | 10° narrow FOV (black cylinder with lens) |
| Ambient Sensor | 180° wide FOV (white round diffuser) |
| CCT Range | 2,200K – 1,000,000K |
| Lux Range | 0 – 100,000+ lux |
| Communication | |
|---|---|
| Protocol | Bluetooth Low Energy (BLE) |
| Frequency | 2.4 GHz ISM band |
| Direct Range | 30ft to fixture |
| With Mini Hub (BLE) | 20ft sensor → hub, 50ft hub → fixture |
| With Mini Hub (Network) | Unlimited (via UDP broadcast on LAN) |
| Update Interval | 15 seconds (default, configurable 5–3600s) |
| Power | |
|---|---|
| Battery | CR2477 coin cell (pre-installed) |
| Battery Life | 10+ years |
| USB-C | Sealed port for hard-power installations |
| Operating Hours | Dawn to dusk (auto night suspend) |
| Physical | |
|---|---|
| Dimensions | 1.2″ × 4″ (32mm × 104mm) |
| Mounting | Built-in adhesive on swivel cylinder base |
| Swivel | Up/down tilt for sky aiming |
| IP Rating | IP20 (indoor use) |
| Outdoor | Waterproof enclosure available separately |
| Compatibility | |
|---|---|
| Fixtures | Circadian Sky, Virtual Sun |
| Min. Firmware | v2.0.61 |
| App | Innerscene Studio (iOS and Android) |
| Safety & Warranty | |
|---|---|
| Battery Safety | UL 1642 Listed |
| Warranty | 5 years |
Innerscene Mini Hub Specifications
| Connectivity | |
|---|---|
| SkySync Reception | BLE, 20ft range from SkySync |
| BLE TX Power | +21 dBm (ESP32-S3 built-in antenna) |
| Wireless Relay | Innerscene Wireless proprietary mesh (no router needed) + BLE rebroadcast |
| Network Output | UDP broadcast (port 65003, AES encrypted) |
| Ethernet | 10/100 Mbps |
| WiFi | 2.4 GHz, WPA2-PSK, via web UI |
| Cloud Mode | TCP to Innerscene Cloud (SSL, outbound only) — coming soon |
| Physical & Electrical | |
|---|---|
| Power | PoE (IEEE 802.3af) or USB-C (5V) |
| Consumption | 0.5W |
| Enclosure | 78mm × 27mm × 20mm |
| Antenna | Built-in (internal PCB antenna) |
| Mounting | Single screw to any surface |
| Operating Temp | 0°C to 40°C (32°F to 104°F) |
| LEDs | Power (solid) & Ethernet (activity) |
| Warranty | 5 years |
Further Resources
| Circadian Sky User Guide | innerscene.com/products/circadian-sky/user-guide |
| CS Installation Manual | innerscene.com/products/circadian-sky/installation-manual |
| VS Installation Manual | innerscene.com/products/virtual-sun/installation-manual |
| Mobile App | Search "Innerscene Studio" on the App Store or Google Play |
| Support | [email protected] |
Specifications subject to change. Visit innerscene.com/products/sky-sync • © 2026 Innerscene Corporation. All rights reserved.